For any dog that has a sensitive stomach, these homemade dog treats are perfect because it only contains 6 ingredients and it's all natural.
Our furry little ones ask for so little and yet give us an unlimited source of love and companionship. That is why having a good supply of healthy homemade dog treats is a must because it's one of the few things that they absolutely love which is such a small price for what they give us. 🙂
I am a stickler for 0 sugar and low-fat treats. There are no added sugars and added oils and fats besides the peanut butter in this homemade dog treats recipe which is super important to me - especially since sugary treats can flare up infections and fatty treats are just bad for the pancreas, especially for older or overweight dogs.
If your dog is sensitive to grains, I also have a grain-free 3 ingredient dog treat recipe made with chickpea flour as well.

This year, for my little guy's birthday I decided to make him some homemade dog treats. I'm a stickler for limited natural ingredients in his food and snacks, particularly because he has a very sensitive stomach. So for anyone who has pups with the same issue, I hope this recipe finds it's way into your hands and it makes your pup a very happy puppy!
INGREDIENTS
There are only 6 ingredients for this homemade dog treats recipe (not including the water). They should be very easy to find at your local grocery store.

I used spelt flour for the recipe because it creates a dry and tough dough, which results in a more dry crunchy biscuit.
For the rolled oats, make sure the ingredients on the packaging only have oats in it. It should not contain any sugar or flavorings.
For the peanut butter, please use the all-natural peanut butter with no sugar added. The banana already has a natural sweetness.
PUTTING IT TOGETHER
Mix the wet ingredients together (the egg, mashed banana and water) and slowly mix in the dry ingredients and then knead away!
When you are making this dough, you will notice that the dough may be a bit dry, you can additional water, 1 teaspoon at a time to make it more pliable and easier to knead but the dough should be very tough and somewhat dry. We want these treats to turn out hard, crunchy and dry.

You can use any type of cookie cutter for this recipe, I prefer smaller ones since they are smaller dogs. If you don't have any cookie cutters, you can cut them up into little squares or rectangles.
We want to also bake this in the oven on a slightly lower temperature because our goal is to dry out the biscuits.

STORAGE & SHELF LIFE
As long as you dry them out really well in the oven they will keep for a month. I even managed to stretch mine to two months. The treats should be hard as a rock after they are cooled, and you should not be able to break them easily by hand. I usually like to keep these in treat jars or metal tin boxes as well out on the shelves. They don't need to be refrigerated as long as they have been dried out properly.

If you like my recipes and want to be updated on when new ones come out, please consider subscribing to my newsletter (we don't spam) and follow along on Instagram, Facebook, and Pinterest for all of my latest recipes!

")
Recipe Card
Homemade Dog Treats (6 Ingredients)
Joyce's Recipe Notes
- When you are buying peanut butter and oats, make sure there is no sugar and extra flavorings in the ingredient label.
- As long as you dry them out really well in the oven they will keep for a month. I even managed to stretch mine to two months. The treats should be hard as a rock after they are cooled, and you should not be able to break them easily by hand. I usually like to keep these in treat jars or metal tin boxes as well out on the shelves. They don't need to be refrigerated.
- [Optional] If you want to make sure they are dried out properly, once the oven has been turned off, keep the treats in the oven until the are cool. The residual heat in the oven will continue to dry it out even more. 🙂
Ingredients
Dry Ingredients
- 2 cups rolled oats (not instant oatmeal)
- 2 cups spelt flour
- 2 cup all purpose flour
Wet Ingredients
- 2 bananas (mashed)
- ½ cup natural peanut butter (no sugar, or salt)
- 1 egg
- ½ cup water
Instructions
- Pre-heat oven to 325F (162C)
- Combine the wet ingredients into a mixing bowl
- Slowly add in the dry ingredients into the wet ingredients bowl
- Knead for approximately 10-15 mins the dough until everything has been incorporated. The dough is supposed to be a little dry and tough. This is because of the spelt flour and it will produce a more crunch and dry biscuit.
- If the dough is hard to knead and doesn't stay together, add water 1 tablespoon at a time until it comes together in a dough ball.
- Roll out the dough to approximately ¼ inch thick and cut out biscuits with cookie cutter or cut into squares with a knife
- Bake in the oven for 40-45 minutes. The bottoms should be golden brown but not burnt. The biscuits will be slightly soft in the center when you take it out of the oven, but it will harden when it cools down.
- Allow the biscuits to cool for 1-2 hours
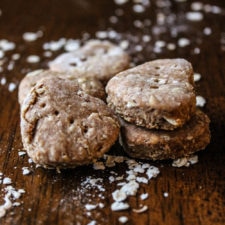
- Ta da! Some treats for some happy dogs!
Nutrition
*Nutritional information is calculated using online tools and is an estimate*
Disclaimer: We are a participant in the Amazon Services LLC Associates Program, an affiliate advertising program designed to provide a means for us to earn fees by linking to Amazon.com and affiliated sites, however I provide these links to make items easier to find if you cannot purchase this locally and I would never recommend anything I don’t own myself or highly recommend. I would prefer you buy your items locally if possible to support your local shops (and chances are they are cheaper locally as well!) 🙂

Justin says
can we use slightly less spelt flour for less crunch? my dog is getting old and i don't want him eating things that are Too hard/crunchy, but still enough to scrape off things/help clean his teeth as you mentioned in some comments.
Joyce Lee says
Hi Justin!
Yup, you can use a little less spelt flour, which will make the dough slightly softer and a little softer.
You can also try baking it for less time, drying it out less. This is what I would do for a softer treat. Doing this will make a softer treat, which means there will be a bit of moisture in it still, so you need to be careful how you store it. Don't store them for too long, especially if you live in a hot and humid area so that it doesn't mold since we don't use any preservatives in these. To be on the safe side, you can either keep them in the fridge or freezer.
Hope your doggo love these, and please give him lots of pets and a hug for me.
Julie says
4th time I’ve made these,last time they must have been to soft and they went off,so this time I will make sure they are hard and dry, but my little boy loves them and they are good for his belly. If you have any other recipes for delicate belly’s ,I’ll like to try my dog on. Thank you
Joyce Lee says
Hi Julie,
I totally understand. Our little guys have sensitive stomachs too. I created these for my little guys, but wanted to also share this with all the pup parents out there so that they can all have a happy belly!
I'm sorry that one batch went off. If you aren't too sure if these are dry enough, I sometimes will leave them out on the counter for a few days to dry out as well before putting them in containers. I live in a dry area though, so if you live in an environment with a lot of humidity that might not work for you.
I do have another treat recipe! I have a 3 ingredient dog treat that's grain-free and made with chickpea flour, peanut butter and pumpkin. Here is the link : https://pupswithchopsticks.com/homemade-grain-free-dog-treats-3-ingredients/
Give your pup a big hug and scritches behind the ear for me!
Julie says
Thank you Joyce , glad to say the last batch I made were perfect, my little bundle of joy love’s them, you’ve just got to make sure you dry them out well and they will last around 3weeks , thank you for the recipe, I will try that next and I’ve got some cookie cutters now. Happy baking
Joyce Lee says
Hi Julie!
Yay!! I'm so happy the last batch came out perfect! Don't forget to jot down the timing of how long it took to dry out in your oven! 🙂 Or jot it down here on this comment so we can reference it in the future! I am super happy I can share this with everyone and even more super happy your little one is happy and loves them! Lots of hugs to you both!
Chloe says
I've made 3 batches of these and my very picky dog LOVES them. I subbed brown rice cereal (1 ingredient, just brown rice) the first 2 times because I couldn't find spelt flour, and they tasted great lol, like a cracker. Trying spelt today. Thanks for this recipe, it's great!
Joyce Lee says
Hi Chloe!
Yay I'm so happy your pup likes it!
Awesome idea with the brown rice cereal substitution! I should try it as well!
Give your little one a big hug for me!
Katherine says
Hi!
I just made these and they smell heavenly. However I tasted one and I'm worried they're a bit dry? I have no idea what dogs like, but when I ate one I had to sort of swallow it down because it turned very dry and crumbly once I chewed it. Are they supposed to be that way, or did I overcook them?
Best regards 🐶💓
Joyce Lee says
Hi Katherine,
I actually do the same thing, and tastes the treats myself haha! 🙂 So glad I'm not the only one that does that! heehee
I made the recipe to be dry and crunchy on purpose so that they can be stored longer, since any kind of moisture will create mold.
I also wanted the treats to have a bit of crunchiness to them to help scrape off plaque when they chew on them. 😊
Hope your pup enjoyed the treats and give them a big hug for me please!
Joyce
Linda says
I plan on making today. What is the best substitute for the spelt flour, please? My old girl has teeth problems (and belly problems) so I'm thinking about not making these quite as crunchy. Thank you Thank you! I'm so happy I found this recipe!!
Joyce Lee says
Hi Linda,
Apologies for the late reply, Wilbur (my pup) passed away this week so I have taken some time off to grieve the little guy.
Hmmmm...You can try using chickpea flour in place of spelt flour.
I have a 3 ingredient dog treat recipe that uses chickpea flour for pups that have a grain allergy that might be easier on his belly. (https://pupswithchopsticks.com/homemade-grain-free-dog-treats-3-ingredients/)
You can also try using all-purpose flour, but you might have to adjust the cooking time to make it not as crunchy. The less time you keep it in the oven, they less hard and crunchy it will be on their teeth.
I hope your little one likes these, and please please please give her a big hug for us.