
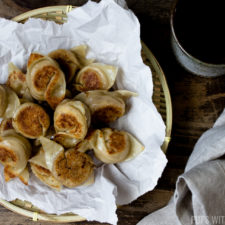
A taro bun remade into tiny bite-sized taro dumplings filled with buttery salted duck eggs, taro, and lightly sweetened with condensed milk.

Whenever I am craving a specific type of steamed bun I pull out my dumpling wrappers from the freezer and throw together the filling and stuff them into dumplings instead. As much as I love eating steamed, soft and fluffy bao (buns) there are days when I just want a quick fix.
Don't get me wrong, I don't think making dumplings is a quick process but I save a bit of time by buying dumpling skins instead of having to make the bao (buns) from scratch. I also love bite-sized chewy snacks, it gives me a bit more control on how little or how much (whole tray) I want to eat!
These little salted egg taro dumplings really hit the spot whenever I am craving a taro bun. It's lightly sweetened with a bit of condensed milk, slightly salty from the buttery salted duck eggs and creamy from the condensed milk, coconut cream and taro. Definitely not an everyday kind of snack since it's a bit heavy but awesome as a treat for yourself and some friends to share. 🙂

INGREDIENTS
For this Sweet & Savory Salted Egg Taro Dumplings, most ingredients can be found at an Asian grocery store.

For the dumpling skins, make sure you are not buying wonton skins. If you look at the ingredients, it shouldn't contain any egg in it. Dumpling skins are generally thicker than wonton skins and are beige in colour (not yellow).
You can find taro at any Asian grocery store. I have also found these in Indian grocery stores and sometimes even my local grocery store as well!
Salted duck eggs will be available at an Asian grocery store. I don't recommend buying them online because they are quite fragile and may arrive broken. I have also noticed that online sellers seem to mostly sell fully cooked salted duck eggs instead of the raw ones as well and for most recipes you usually want the raw salted duck eggs.
PUTTING IT TOGETHER
Protect Your Hands From Raw Taro
While you are peeling the taro (I like to use a vegetable peeler), make sure you use a cloth or towel to wrap and hold on to it instead of holding it with your bare hands. If you have sensitive skin, the starches may irritate your skin and make it feel itchy.
WARNING! Taro MUST Be Fully Cooked Before Consumption!
Once the taro has been peeled, chop them into 2 inch chunks and boil it in water. It is important that the taro is cooked well done before you start making the filling because taro that has not been fully cooked contain a high amount of calcium oxalate which can cause kidney stones or gout.

Boil them for approximately 20-25 minutes and use a knife to poke through the taro it to see if it is fully cooked. There should be absolutely no tension and the knife should be able to cut through it very easily like melted butter. If it still feels tough or has a bit of tension when you cut it, then continue to cook it for 10 minute intervals until it is soft.

Folding Taro Dumplings into Goldfishes!
Unfortunately, once you cook them, they won't look like gold fishes anymore 😛 but I find this type of fold helps with keeping it's shape better in the pan which means less of a chance to rip or stick to the pan! 🙂 Here's how I fold taro dumplings into goldfishes.

For this type of fold to work, you will need to buy square dumpling skins.
- Use water to wet the edges of the dumpling skin (this will be the glue) and fill the dumplings with the taro filling (I usually use about 1 ½ teaspoon of filling). Do not over-stuff these little guys or they will be tough to fold together. Pressing the wet edges together will make it stick together.
- Once you have a triangle formed, gently flatten it out the filling with your fingers. This will make it easier to twist the end together.
- Hold the dumpling with folded seam facing you and the filling facing outwards and dab a bit of water onto one side of the dumpling.
- While holding the 'wings' of the dumplings with your finger and thumb, press your fingers towards each other until the 'wings' overlap and then press down where you dabbed the water to hold it in place.

Dippy Dip Dip for Your Taro Dumplings?
If you enjoy dipping your taro dumplings, a few things I find go well with these are:
- Plain Coconut Cream
- Condensed Milk with a Dash of Cinnamon (Slightly watered down with a bit of milk so it's not super thick)
More Recipes To Use Up Leftover Dumpling Wrappers
If you like my recipes and want to be updated on when new ones come out, please consider subscribing to my newsletter (we don't spam) and follow along on Instagram, Facebook, and Pinterest for all of my latest recipes!
Recipe Card
Sweet & Savory Salted Egg Taro Dumplings
Joyce's Recipe Notes
- Highly recommend a non-stick frying pan for this recipe to prevent the dumplings from sticking to the pan and ripping. Do not use a cast iron pan.
- Raw taro has a very high amount of Calcium Oxalate which can cause gout or kidney stones if it is not fully cooked through, so it is extremely important to fully cook the taro before eating it.
Ingredients
- 1 package dumpling wrappers (square)
- 600 g taro (approximately 3 cups)
- 2 salted duck eggs
- ½ cup condensed milk (add ¼ cup more if you like it sweeter)
- ¾ cup of butter (melted)
- 1 ½ teaspoon cinnamon
Instructions
Prepping and Cooking the Taro
- Use a dish cloth to hold the taro so your skin is not directly touching the taro and peel it with a vegetable peeler. (Taro may irritate or cause itchy skin if you have sensitive skin)
- Once the taro has been peeled, chop it up into 2 inch chunks
- Set the stove to medium low heat and fill a pot with water and boil the taro with a rolling boil for approximately 25 minutes - time will vary depending on how small or large you cut the taro. It is extremely important you fully cook taro before using it (see notes below)
- Check if the taro is done by sliding a knife through it. If there is any resistance, add 10-15 minutes to the cooking time. The knife should slide into the taro very easily like melted butter, if it doesn't continue to cook it until it is soft.
- When it is soft, drain the water and let it cool for 15 minutes.
Making the Filling
- Transfer the taro to a large mixing bowl and add melted butter, condensed milk and cinnamon to it and mash it. (I like to use a potato masher, but if you like it completely smooth, you can use a hand mixer but be careful not to over mix it with the hand mixer, else it becomes gluey)
- Add the salted duck eggs (both whites and yolks) and continue to mash it until it is very well incorporated and the duck yolks are evenly dispersed within the taro. (You shouldn't see big chunks of duck egg yolks)
- The filling should have a thick mashed potato consistency, if it is too watery or thin you can cool it for 20 minutes in the fridge to solidify it a bit before folding the dumplings.
Folding the Dumplings
- Use water to wet the edges of the dumpling skin (this will be the glue) and fill the dumplings with the taro filling (I usually use about 1 ½ teaspoon of filling). Do not over-stuff these little guys or they will be tough to fold together. Pressing the wet edges together will make it stick together.
- Once you have a triangle formed, gently flatten it out the filling with your fingers. This will make it easier to twist the end together.
- Hold the dumpling with folded seam facing you and the filling facing outwards and dab a bit of water onto one side of the dumpling.
- While holding the 'wings' of the dumplings with your finger and thumb, press your fingers towards each other until the 'wings' overlap and then press down where you dabbed the water to hold it in place.
Cooking the Dumplings
- Set the stove to medium low heat and add a bit of oil to a non-stick frying pan
- Once the oil is hot, add the dumplings in. Do not overcrowd the pan - you may need to do this in a few batches.
- Brown both sides of the dumplings to a golden crispy brown.
- Once both sides of the dumplings are crispy brown, add ¼ cup of water into the pan and cover it with a lid and steam it for approximately 2 minutes (or until the water has evaporated).
- Once the water has almost evaporated, remove the lid to fully evaporate all the water. The dumplings will be super soft and can easily rip at this point, try to refrain from touching it until it has a a crispy brown bottom again. Flip the dumpling and cook the other side until it is crispy brown.
- Remove from pan and enjoy as is or with a bit of dipping sauce! 🙂
(Optional) A Few Quick Dips for Dipping
- Plain Coconut Cream
- Condensed Milk with a Dash of Cinnamon (Slightly watered down with milk so it's not super thick)
Nutrition
*Nutritional information is calculated using online tools and is an estimate*

josie says
Oh !!! and Wow !!! Something new for this inventive dumpling RECIPE. I do agree with the above viewer Heather says.
Besides, Taro is good for health too. Thanks.
Joyce says
Aw you're too kind! 🙂
heather (delicious not gorgeous) says
DAAAANG. these are so inventive! can you get these onto all the dim sum menus? thanks (;
Joyce says
haha! That would be kinda awesome! Definitely should try to make it with a bao one day - unless you're lazy like me pwahaha 🙂