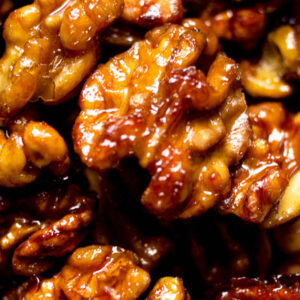
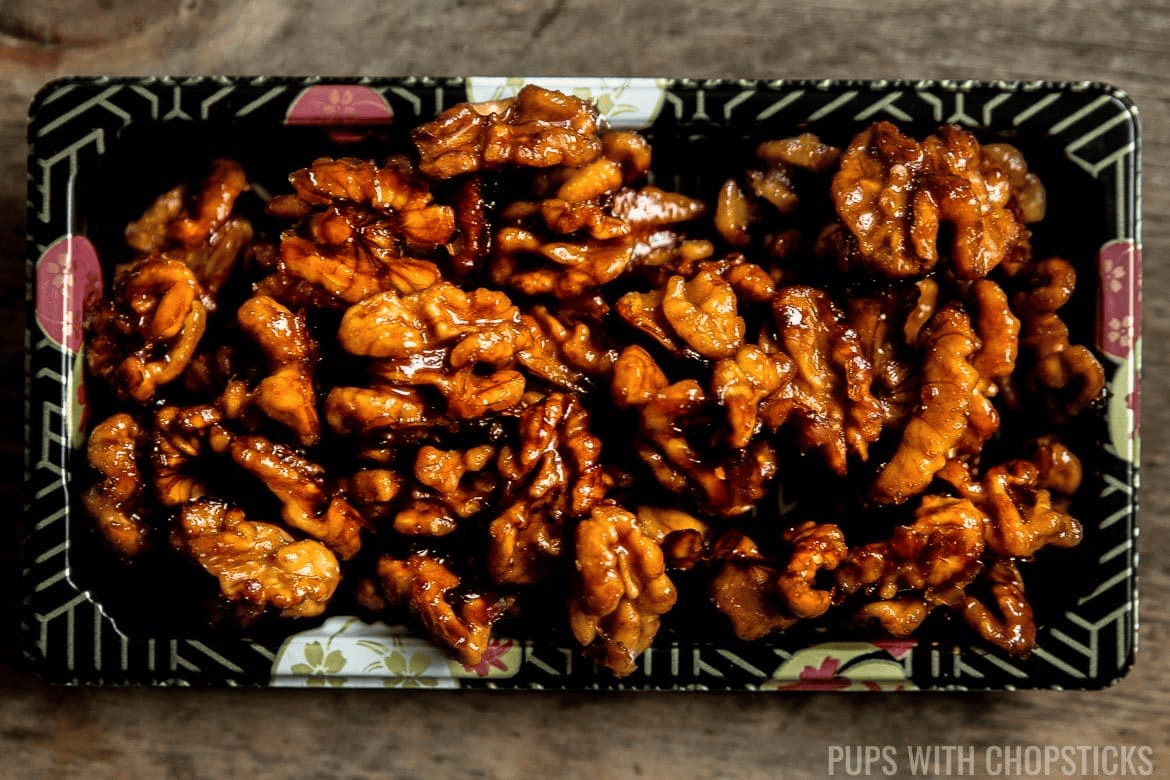
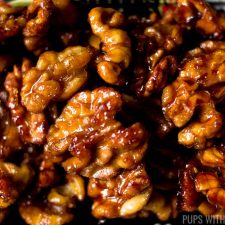
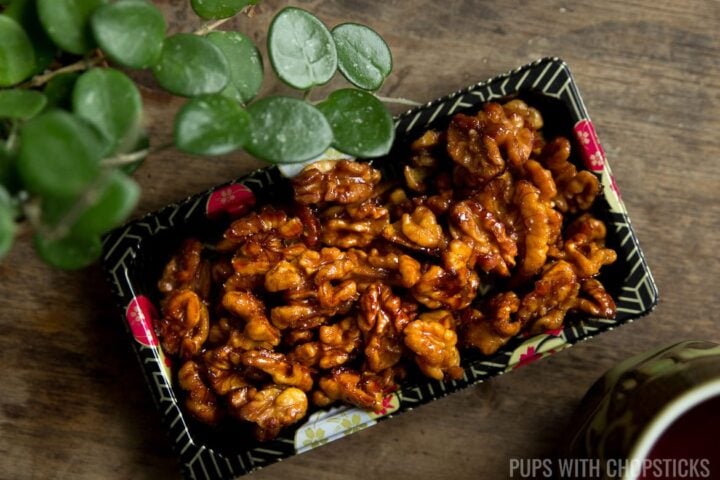
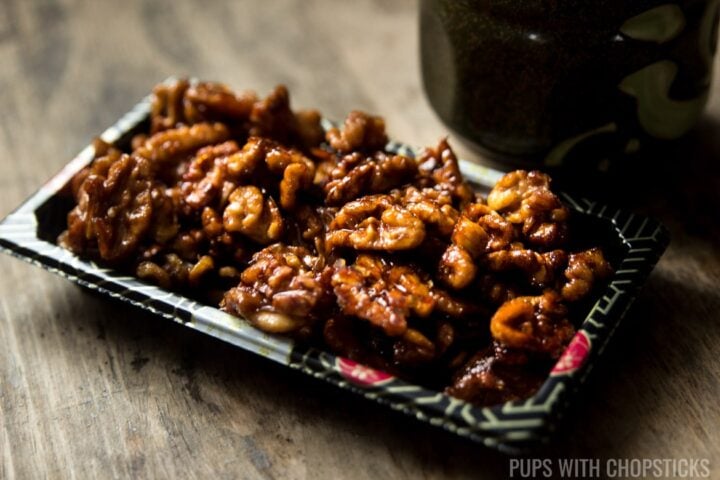
If you're a fan of sweet and crunchy treats, you're going to love these candied walnuts. With a perfect balance of sweetness and a delightful crunch, these walnuts are coated with sugar and a hint of salt for a delightful contrast of flavors. You need only 3 ingredients to make them from scratch in just 25 minutes!

If you’re anything like me, you probably don’t like the bitter taste that walnuts have, if that's the cause this recipe is perfect for you!
These candied Chinese walnuts are crispy with a hint of sweetness, uses a boiling technique that I learned from my dad when he worked at a Chinese restaurant to remove the bitterness from the walnuts.
These candied walnuts are tasty and incredibly easy to whip up at home. They’re perfect to have on hand for snacking or to elevate your salads, desserts, or charcuterie board. Try this recipe, and you won’t want to have plain walnuts ever again!
Read on to learn exactly how to make this delicious candied walnuts recipe today!
What are Candied Walnuts?
Candied walnuts are a delightful treat that combines the natural crunch of walnuts with a sweet, caramelized sugar coating.
Making candied walnuts at home is not only easy, but it also allows you to control the ingredients and flavors. You can adjust the amount of sugar, add a sprinkle of salt or a dash of cinnamon, or even experiment with other spices.
The end product is a sweet, crunchy, and utterly delicious treat that can elevate a simple salad, be the star ingredient in various walnut recipes, or be devoured as a snack on its own.
Why You’ll Love This Candied Walnuts Recipe
Quick: You can have these delightful candied walnuts ready from start to finish in just twenty-five minutes! Whether you are in a rush or simply want a quick snack, this recipe is perfect.
Doesn't Have the Bitter Walnut Flavor: The unique boiling method of removing bitterness from the walnuts makes this recipe a hit with all family members. The delightful mix of sweetness with its crunchiness, will have everyone reaching for more.
Variety of Cooking Methods: This recipe gives you the flexibility to choose between oven-roasting and stovetop cooking. You can even deep-fry the walnuts if you want to recreate Chinese restaurant-style candied walnuts at home.
Ingredients You’ll Need to Make Candied Walnuts
All you need are some incredibly simple, pantry-staple ingredients to make this delicious candied walnuts recipe at home.
Here's an overview of the specific ingredients for this recipe. For the exact ingredients and measurements, please scroll to the recipe card below.
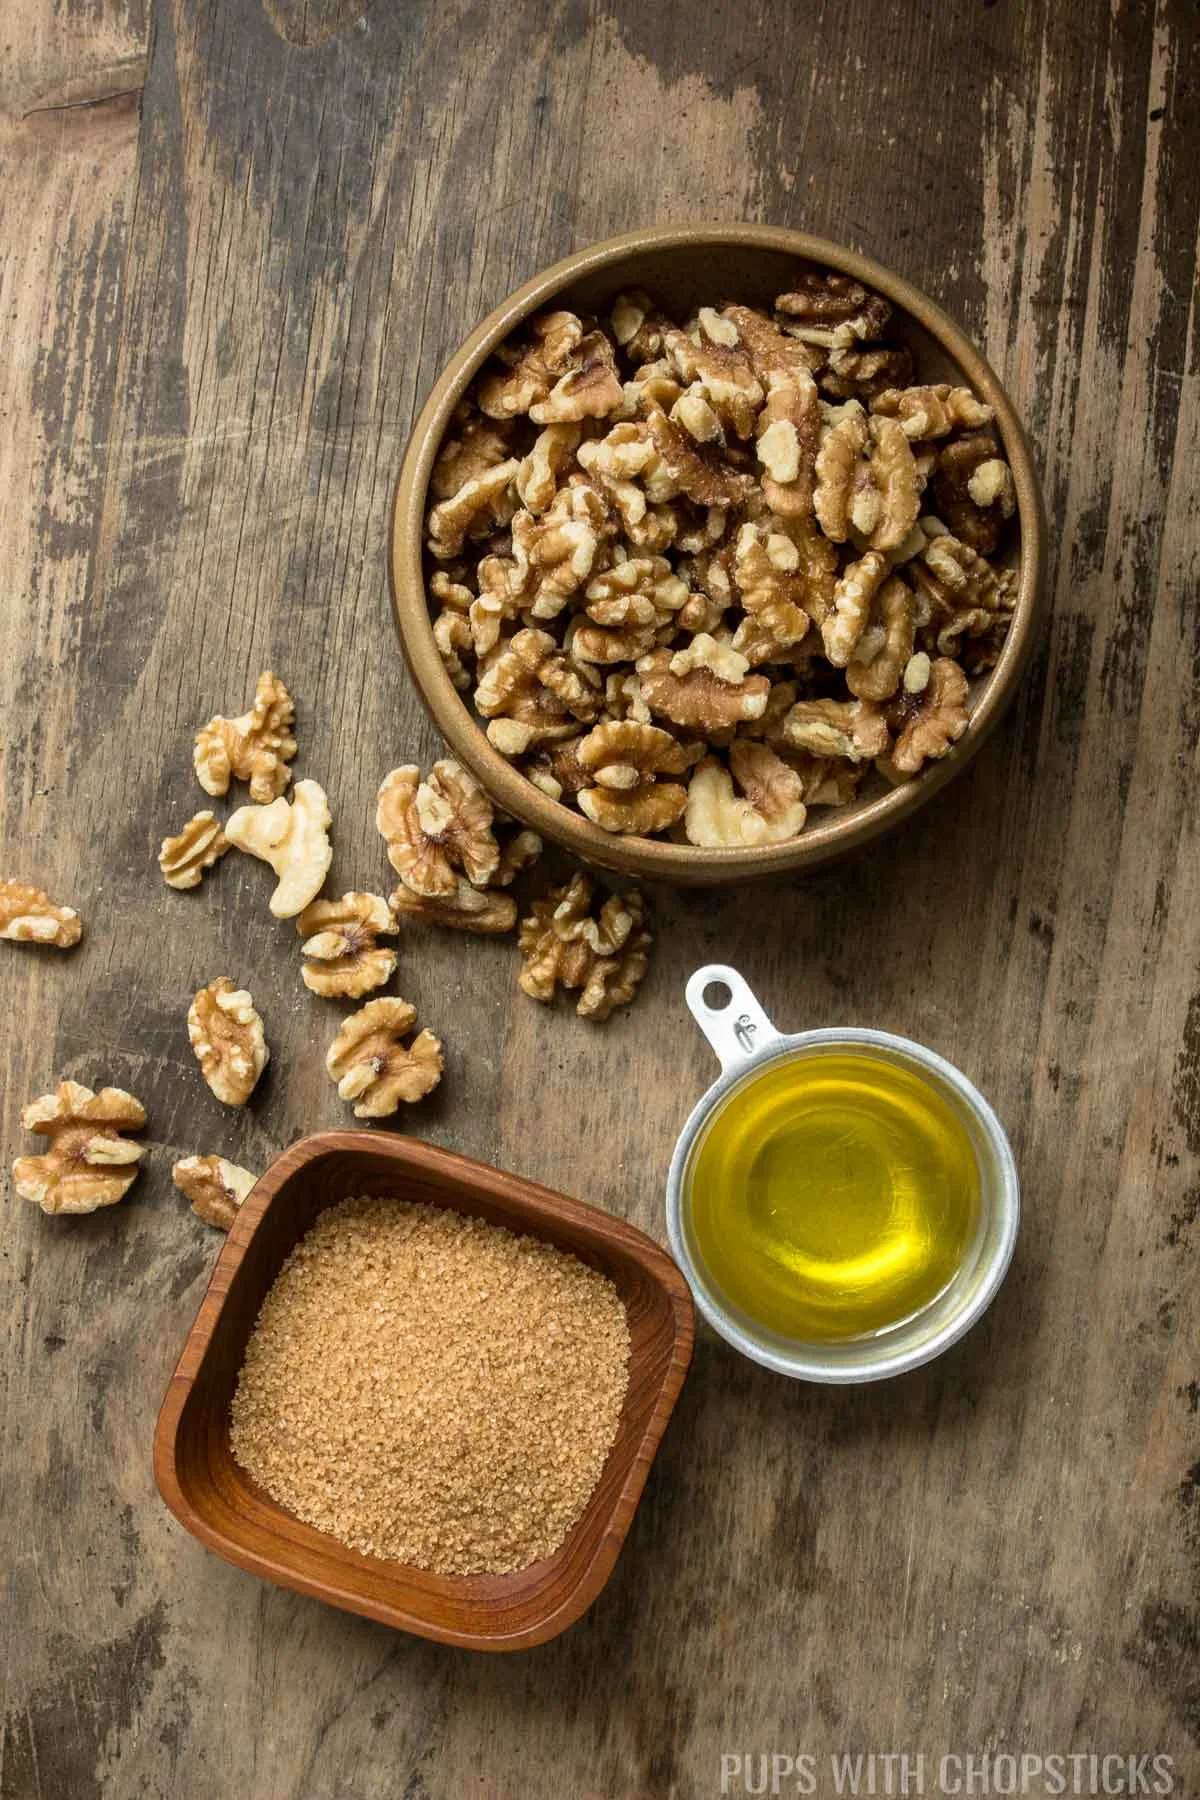
- Walnuts: This is the star of our recipe! Walnuts not only bring a unique flavor and crunch. I like to use walnuts for this recipe because of all the nooks and crannies that hold all the sugar onto it, which makes it more candied and crispy.
- Sugar: The sweet element in our candied walnut recipe. It caramelizes during the cooking process, giving the walnuts a delightful sweet coating. I have tested this with coarse raw sugar, demerara sugar, granulated white sugar, and powdered sugar and they all work well for this recipe but I always use cane sugar since this is what I always have on hand.
- Oil or Butter: Adding a touch of oil will help the nuts roast evenly in the oven. I personally like to use oil for this recipe over butter, but I do occasionally use butter for this for a bit more flavor. For the oils, I like to stick to the more common oils like avocado, canola and corn oils.
- Salt: While this ingredient is optional, a bit of salt can balance out the sweetness and bring out the flavors more. If you're a fan of sweet and savory combinations, you'll love what this addition does to the recipe.
How to Make Candied Walnuts (Step by Step)
Making this incredible candied walnuts recipe at home is super easy and will give you great results every single time. Here's how to make it step by step:
Boiling the Walnuts

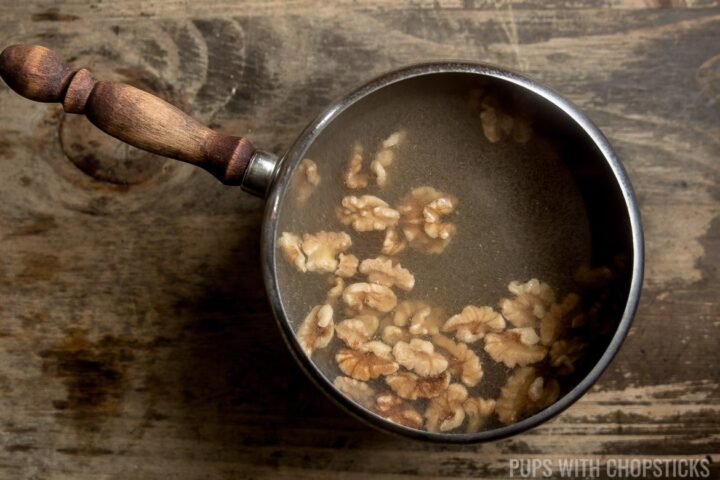
Start by boiling the walnuts. Place a saucepan of water on the stove over medium-high heat. Once the water starts to boil, add the walnuts and let them simmer for about four to five minutes.
Next, drain the walnuts. You can do this by pouring the water from the saucepan through a strainer. Transfer the drained walnuts into a small bowl.

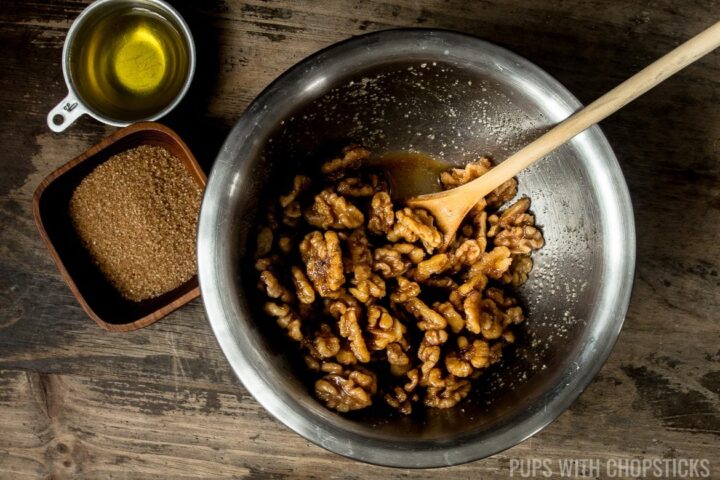
While the walnuts are hot, sprinkle them with sugar and stir until well coated. The residual heat from the walnuts will melt the sugar. If you want to add a bit of salt, this is the right time to do it. Once the sugar has dissolved thoroughly, add in the oil and stir well.
Oven Roasting the Walnuts (My Preferred Method)

Preheat your oven to a temperature of about 350°F (180°C).
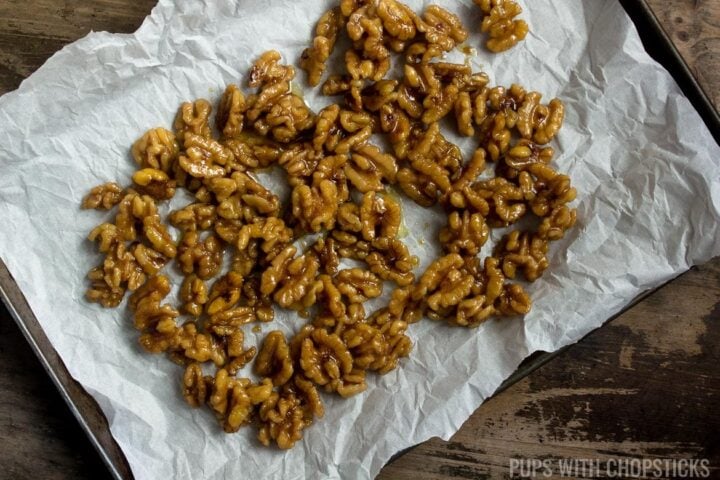
Prepare your baking sheet. Lay a sheet of parchment paper on a baking sheet, then spread your sugar-coated walnuts on it. Make sure the walnuts are spread out in a single layer.
Roast the walnuts in the preheated oven. After the oven has reached the required temperature, put the baking sheet in the oven and roast the walnuts for about ten minutes.
Flip the walnuts after the initial roasting time has elapsed. Take the baking sheet out of the oven, gently flip the walnuts, and put it back in the oven for another ten minutes. Make sure the walnuts are still in a single layer to prevent them from sticking together.
Check the walnuts after the second roasting. If they don't look brown and roasted enough, put them back in the oven for an additional five minutes, and if necessary, another two to three minutes.
Let the walnuts cool for at least half an hour to forty minutes before storing or eating.
Stove Top Instructions
Heat the oil in a non-stick skillet over low heat. Add the walnuts and toast them for about ten to fifteen minutes. Make sure to stir continuously to prevent them from burning.
If they don't look toasted enough, continue to toast them for another two to three minutes.
Remove the walnuts from the heat. Transfer them onto a plate or baking sheet lined with parchment paper.
Spread the walnuts in a single layer and let them cool for about thirty to forty minutes before storing or eating. Enjoy your homemade candied walnuts!
Deep Frying Method
Alternatively, if you want to make it exactly like how they do at the restaurants, you can deep fry it in oil for 3-5 minutes on low heat, just make sure the sugar gets fully dissolved with the hot walnuts right after you strained them from the boiling water, you want to create a light syrupy coating on all the walnuts.
You can also skip adding the oil with the sugar since you will be deep frying it in oil.

Joyce’s Tips For Making the Best Candied Walnuts
Boil the Walnuts: To remove the bitterness from the walnuts, boil them for about four to five minutes. This process also softens the walnuts, preparing them for the candying process.
Evenly Spread the Walnuts: When baking or toasting, spread the walnuts in a single layer on the baking sheets or non-stick skillet. This makes sure that all the walnuts cook evenly and acquire a uniform golden-brown color.
Keep an Eye on the Heat: Walnuts can burn easily, so make sure to keep the heat at a medium level when using the stove top method, and stir regularly. If oven roasting, keep a close eye on the walnuts during the final minutes of roasting.
Allow to Cool Completely: After cooking, let the candied walnuts cool completely before storing or eating them. This will help them to achieve the perfect crispy texture.
Serving Suggestions
- Candied walnuts make a great addition to the Lao Crispy Rice Salad (Nam Khao). Just toss them in before serving, and enjoy the sweet and savory combination.
- Want to jazz up your usual granola mix? Break the candied walnuts into smaller pieces and mix them in. They'll add a surprising twist to your breakfast routine.
- For a dessert with a twist, serve the candied walnuts with your Chewy Hawaiian Butter Mochi. The crunch of the walnuts complements the chewy texture of the mochi perfectly!
- Amp up your appetizers by pairing candied walnuts with your Crab and Cheese Spring Rolls or Baked Mussels with Cheese and Garlic. The sweetness of the walnuts pairs well with the flavor of the rich cheese.
- Candied walnuts make a great addition to a charcuterie board. Their sweet and slightly salty flavor pairs well with a variety of cheeses, making for a delightful contrast in flavors, you can even add a unique twist by adding crispy lotus root chips to it.
- For a spicy and sweet combination of snacks, I like to serve candied walnuts side with Baked Crispy Stuffed Jalapeno Poppers (Crab Rangoon Style). The sweetness of the walnuts balances the heat of the jalapenos.
Recipe Variation Ideas for Candied Walnuts
This delicious candied walnuts recipe is so flavorful and easy to make, you'll want to try out some of these delicious variations! Here are some great ideas:
Try it Sweet and Spicy: If you love a combination of sweet and spicy flavors, this variation is for you. Simply add a quarter teaspoon of cayenne pepper to your sugar mix before coating your walnuts. The spicy kick from the cayenne pepper perfectly balances the sweetness of the sugar, giving you a delightful flavor contrast.
Go Nutty with Pecans: For a different nutty flavor, replace the walnuts with pecans in this recipe. Pecans have a rich, buttery flavor that pairs beautifully with the caramel-like coating. Just make sure to watch your pecans closely in the oven, as they can burn easily.
Add a Touch of Vanilla: For an added depth of flavor, stir in half a teaspoon of vanilla extract to your sugar mix. The vanilla adds a subtle, sweet aroma that enhances the overall taste of your candied nuts. This variation is especially great if you're using your candied walnuts in baking recipes.
Try Brown Sugar: Swap out the regular sugar for brown sugar in this recipe for a deeper, caramel flavor. Brown sugar has a rich molasses note that adds a delicious complexity to your candied walnuts.
Experiment with Spices: For a warm, festive twist, add a half teaspoon of ground cinnamon to your sugar mix. The cinnamon adds a comforting, aromatic flavor that is perfect for the holiday season.
Frequently Asked Questions
Yes, you can prepare the candied walnuts on the stovetop. Use a non-stick skillet, add some oil, and toast the walnuts for about ten to fifteen minutes. Make sure to stir them regularly to prevent burning.
Yes, you can deep fry the walnuts if you want to make them exactly like the ones served in restaurants. Just make sure that the sugar is fully dissolved with the hot walnuts to create a light syrupy coating.
Oven-roasting allows for larger batches, doesn't require constant attention, and provides more even roasting. The downside is it takes a bit longer. Stovetop cooking is quicker but requires more attention and may result in uneven cooking.
You do not need to refrigerate these candied walnuts. Keep them at room temperature in an airtight container. They will stay fresh for up to 2-3 weeks.
How to Store Leftover Candied Walnuts
If you've just prepared a batch of candied walnuts following our simple and easy recipe, you might be wondering how to store the leftovers. These delicious treats, made with just three ingredients, can last up to two weeks if stored properly.
For best results, store your candied walnuts in an airtight container in a cool, dry place.

Did You Make These Chinese Walnuts?
If you made this candied Chinese walnuts recipe, I want to see! Follow Pups with Chopsticks on Instagram, snap a photo, and tag and hashtag it with @pupswithchopsticks and #pupswithchopsticks. I love to know what you are making!
Please also consider leaving a ⭐⭐⭐⭐⭐ rating and a comment to tell me how it went! I'd love to hear from you if you made this!
If you like my recipes and want to be updated on when new ones come out, please consider subscribing to my newsletter (we don't spam) and follow along on Instagram, Facebook, and Pinterest for all of my latest recipes!

Recipe Card
Crispy Candied Walnuts
Joyce's Recipe Notes
- Pros and Cons of Oven-Roasting: You can make bigger batches, you do not need to watch the stovetop, easier to clean up (throw out parchment paper), and the heat and dry air roast the walnuts more evenly. No major con, except it takes a bit longer.
- Pros and Cons of Stovetop: Slightly quicker cooking time by about 10 minutes, but you have to make it smaller batches and it cooks more un-evenly.
- I have tested this with coarse raw sugar, demerara sugar, granulated white sugar, and powdered sugar and they all work well for this recipe.
- I personally like to use oil for this recipe over butter but I do occasionally use butter for this and it works just as well. For the oils, I like to stick to the more common oils like canola and corn oils, but avocado oil is my favorite oil to use because of it's high smoking point, and it's the healthiest oil of the other 2.
- Salt is completely optional for the recipe and I only recommend adding it if you like sweet and savory flavored nuts.
- Store them in an airtight container in a cool dry place for up to 2 weeks.
- Alternatively, if you want to make it exactly like how they do at the restaurants, you can deep fry it in oil for 3-5 minutes on low heat, just make sure the sugar gets fully dissolved with the hot walnuts right after you strained them from the boiling water, you want to create a light syrupy coating on all the walnuts. You can also skip adding the oil with the sugar since you will be deep frying it in oil.
Ingredients
Instructions
- Put a pot of water over the stove on medium high heat
- When the water starts to boil, add in 2 cups walnuts and boil them for 4-5 minutes
- Drain the water from the pot into a strainer and transfer the walnuts to a small bowl
- While the walnuts are still hot, sprinkle 3 ½ tablespoons sugar over the walnuts and mix well. The residual heat from the walnuts will melt the sugar. If you are using a bit of salt, add ¼ teaspoon salt during this step.
- Once the sugar has dissolved and everything is well mixed, add in 1 ½ tablespoons oil and mix well.
Oven Roasting Instructions
- Preheat the oven to 350F (180C)
- Place a sheet of parchment paper on top of a cookie sheet or pan and pour the walnuts onto it and spread it out into a single layer.
- Once the oven has reached 350F, put the tray in the oven and roast it for 10 minutes
- Once 10 minutes is up, remove the cookie sheet from the oven and gently flip the walnuts and put it back in the oven for another 10 minutes. Make sure it is still in a single layer so the walnuts don't stick together
- Remove the tray from the oven. If the nuts don't look brown and roasted enough, add it back in the oven for another 5 minutes. If it still isn't brown enough, bake it for an additional 2-3 minutes.
- Let the walnuts cool for at least 30-40 minutes before storing or eating it.
Stove Top Instructions
- Using a frying pan, set the stove to low heat and add 1-2 tablespoons of oil into it.
- Add in the walnuts and toast it for 10-15 minutes. Make sure you keep moving the walnuts by mixing it so they don't burn. Keep them on a single layer.
- If the walnuts don't look toasted enough, continue to toast it for another 2-3 minutes.
- Once the walnuts are done, pour them out onto a plate or cookie sheet lined with parchment paper.
- Spread them out into a single layer and let it cool for at least 30-40 before storing them or eating it.
Nutrition
*Nutritional information is calculated using online tools and is an estimate*
Disclaimer: We are a participant in the Amazon Services LLC Associates Program, an affiliate advertising program designed to provide a means for us to earn fees by linking to Amazon.com and affiliated sites, however I provide these links to make items easier to find if you cannot purchase this locally and I would never recommend anything I don’t own myself or highly recommend. I would prefer you buy your items locally if possible to support your local shops (and chances are they are cheaper locally as well!)

Adina Turchin says
These remind me of my childhood! My parents used to always buy these in Los Angeles’ Chinatown, and the container would be empty by the time we got home. This was back in the 70’s! I made these yesterday and they were delicious. Wish my parents were still alive to eat them with me; I cherish the fun memories:) Thank you!
Adina Turchin says
I meant to choose 5 stars, not 4!
Joyce Lee says
I adjusted this for you! 🙂
Joyce Lee says
Hi Adina!
I'm so happy you liked them!
These are exactly what I was trying to make! My parents also always bring these home from the Chinese supermarket and they would disappear fast!
I'm very touched and happy that I can bring those fond memories back, as I also have these memories too. 🙂
Bobby says
Looks delicious and must be very good for a snack.
Joyce Lee says
Hi Bobby!
It's an awesome snack. I can never stop eating them! haha
Frank says
I have fried once. If the nuts are not sweet enough or crispy enough, can I throw back the nuts to re-coat with sugar and bake again?
Joyce Lee says
Hi Frank,
That is a good question. I haven't tried re-coating the nuts with sugar and rebaking them again so I am not sure if it will work. This is definitely an interesting thought and something I might try to test in the future to see if a double coating is possible!
If you did test it out, let me know if it turned out for you!
Tracy says
I did. The nuts weren’t sweet at all so I threw more sugar and a spit of water back in the frying pan and tossed until the pan was dry again. Perfect.
Joyce Lee says
Hi Tracy!
Thanks for the update! It's really good to know you can do that without burning the sugar! 🙂
Janet Lau says
does this method of boiling the nuts work with different types of nuts such as almonds, peanuts, cashews?
Joyce Lee says
Hi Janet,
Hmmm, that's a good question! I haven't tried with different types of nuts, so I am not 100% sure.
If you do test it out, let me know how it turns out with the different types of nuts! I'm curious now also! I might test it out as well in the future when I buy a new batch of nuts. 😊
Arden Le says
BOMB
crispy, sweet, super easy
I love the instructions and photographs! I made this to eat with my charcuterie and it is amazing! Personally I wanted it a teeny bit sweeter but everyone else loves it as is!
This has pretty must sent me down the rabbit hole and now i want to try every recipe on this site! I am currently marinating my oven roasted 5 spice peking chicken! Wish me luck and keep up the amazing work!
You should post your recipes on subtle asian cooking! You deserve all the exposure!!!
Joyce Lee says
Hi Arden!
I'm so happy you liked this! Good call on using them in charcuterie! I am definitely going to be doing this from now on! I like to throw them on salads, because I'm not a huge fan of veggies haha!
Thank you for your kind words! I am always happy I can share my recipes and try to make it as easy to follow as possible.
I had no idea about subtle Asian cooking, and will definitely look into posting on there - thanks so much for this!! I feel so touched! 💖
I hope your Peking chicken turned out, and that you enjoyed it!! 🙂
Mark says
Simply AWESOME.
I am a fan of the savory balancing the sweet, so not only added the suggested salt immediately after removing from the oven, but also premixed that salt with equal pinches of both cayenne and red chili powders. It's still not completely cooled but half has been eaten and a 2nd batch is about to begin.
Thanks PwC!
Joyce Lee says
Hi Mark!
I love the addition of the cayenne and chili powders! I'm excited to try this out next time I make this! Thank you for the brilliant tip!
Audrey Lee says
Tried the recipe out and succeeded on the first try! Yay! Did the oven baked version, the walnuts were dark golden brown after 10 min on each side, anything more would lead to burning. After cooling down, the walnuts are extremely crispy and delicious. Thank you for sharing this recipe.
Joyce says
Hi Audrey!
YAY, high-five!! I actually like doing it the baked way as well. I find it a lot easier and it toasts a lot more evenly too! I'm so happy to hear that you liked this!! 🙂 I'm always happy to share.
Joyce
josie says
I really love this crispy candied walnuts, it is my most favourite snacks any time. After following your ingredients, I tried to put lesser brown sugar for lesser sweetness (this way I can eat more ) and also sprinkled some roasted white sesame seeds on top to make it a bit colorful and texture. Just because of your simple fantastic Recipe, I then encourage myself to do it and real fresh (without buying fthe packaged candied walnuts from the bakery stores which may have been stored long). All my friends after tried mine, and gave a thumb-up !!
Thank you Joyce. You are Great !! 🙂
Joyce says
That's one of the reasons why I decided to finally make this recipe! haha I was always looking for it at the stores and it was a lot cheaper and fresher to make it at home! heehee I'm happy you liked it! Thank you so much for your kind words 🙂
Susan K Pontier says
When do you add the salt? I really want to add equal parts salt and cayenne and I need to know when this is added.
Thank you.
Joyce Lee says
Hi Susan,
Good question! I didn't realize I forgot that step! Thanks for pointing this out to me!
You would add the salt in when you are adding the sugar, so it melts the sugar and salt granules with the hot walnuts - this would be under step 4 under Instructions.
Brilliant idea with the cayenne - I definitely will need to add some of it next time I make a batch!