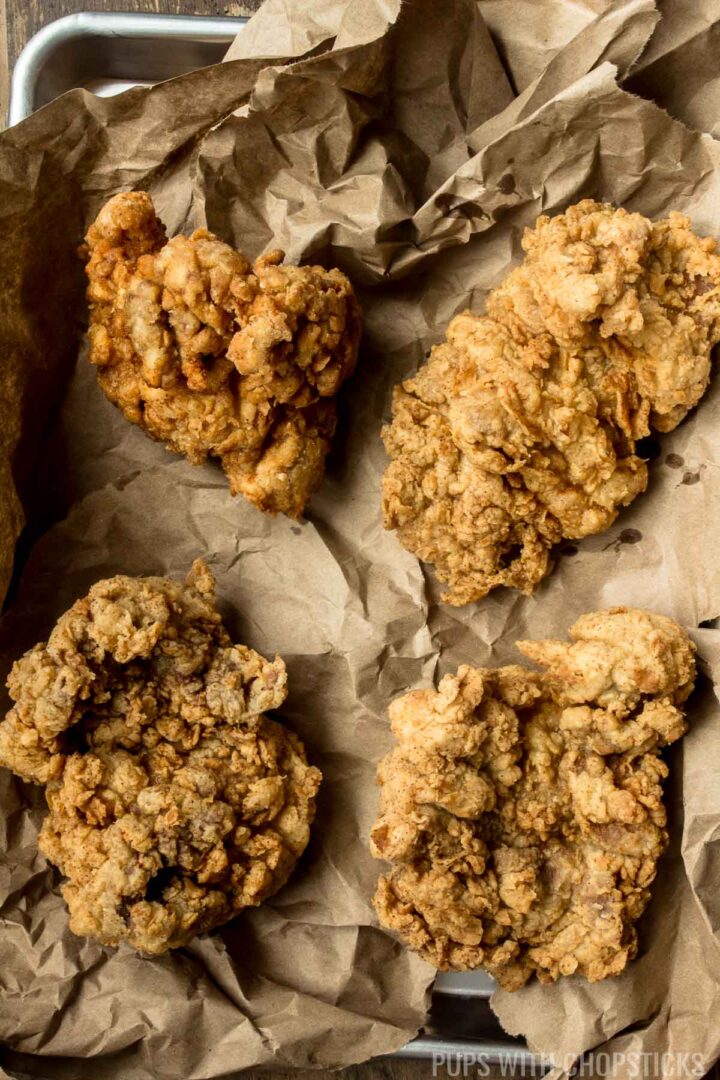
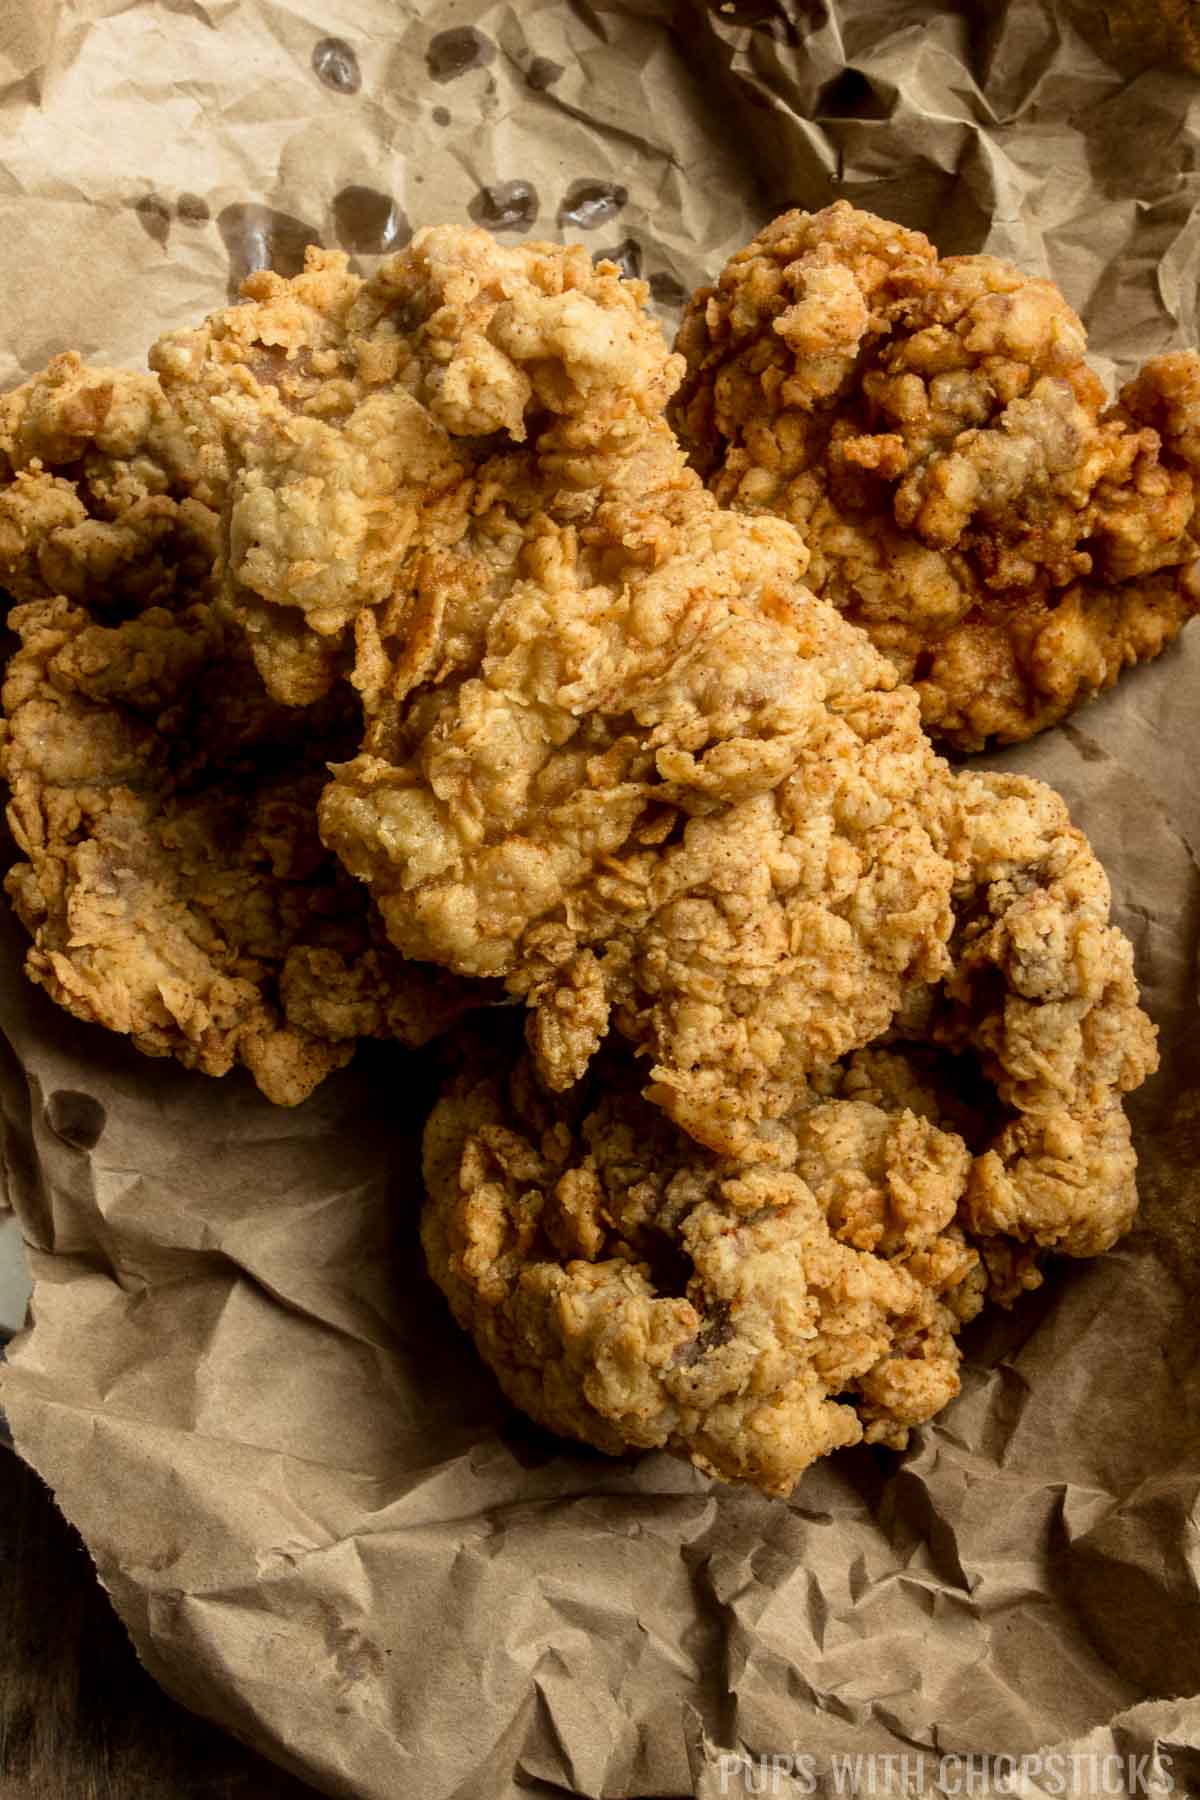
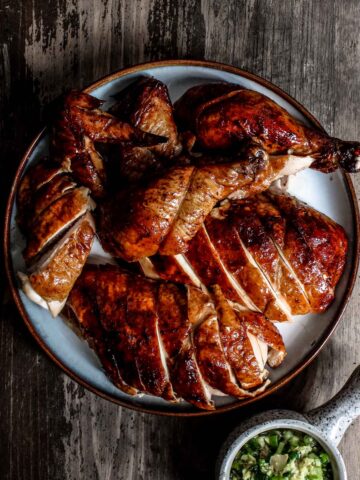
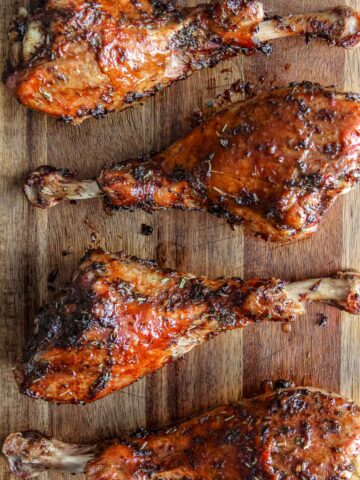
If you’re looking for the Ultimate Super Crispy Fried Chicken Recipe, then this is it. My secret to the crispiest fried chicken ever is using a combination of flour and potato starch with an easy technique that will give you the best fried chicken ever! What’s best is that the chicken stays juicy and flavorful and the batter never falls off the chicken so each bite is crispy to the end!
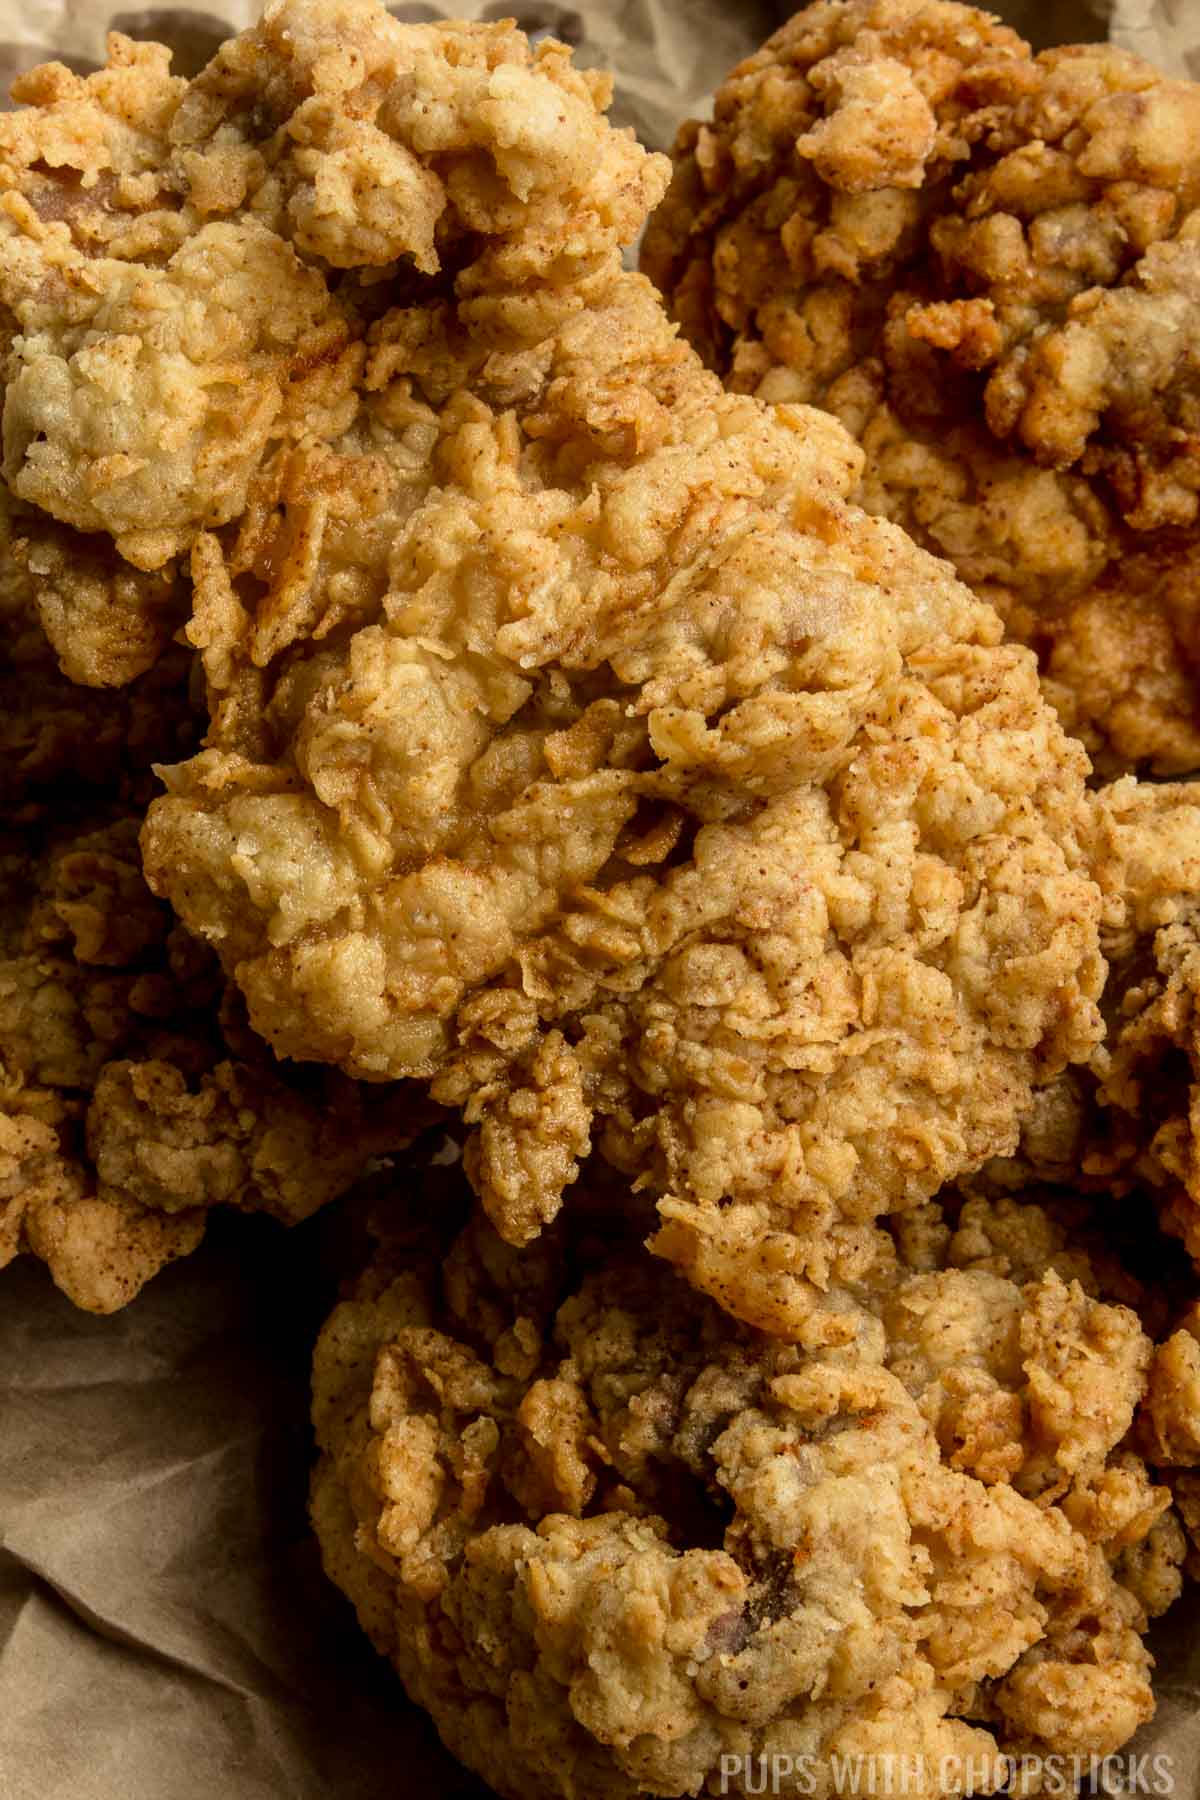
Table of Contents
- What is Crispy Fried Chicken?
- Why You’ll Love This Crispy Fried Chicken Recipe
- Joyce's Tips For Extra Crispy Fried Chicken
- Ingredients You’ll Need to Make Crispy Fried Chicken At Home
- How to Make the Best Crispy Fried Chicken (Step by Step)
- Why Use a Brine for Crispy Fried Chicken?
- How Do You Keep Batter From Falling Off Fried Chicken
- Deep Frying Temperature Tips for Crispy Fried Chicken
- What Type of Oil to Use to Deep Fry Chicken
- Serving Suggestions
- Recipe Variation Ideas for Crispy Fried Chicken
- Frequently Asked Questions
- How to Store Leftover Crispy Fried Chicken
- More Takeout Recipes You May Like
- Did You Make This Crispy Fried Chicken Recipe?
- Recipe Card
- Some More Dinner Recipes You May Like
If there is one dish that never fails to satisfy one’s cravings for comfort food, it’s definitely some crispy fried chicken. This classic dish has been perfected over the years, with each cook adding their own unique touch to create a delicious and crispy bite.
But the secret to achieving the ultimate crispy fried chicken lies in the technique and ingredients that are used. My recipe will give you the perfect method of making this ultimate comfort food recipe!
There isn't much to it because crispy fried chicken to me is meant to be simple, comforting, and delicious.
From the brining process to the choice of seasoning and frying method, every step is super important in creating that irresistible golden-brown crust that encases juicy and tender meat.
Whether you’re a seasoned chef or a home cook looking to impress, learning exactly how to make the best crispy fried chicken is a skill worth honing.
Read on to learn exactly how to make this delicious crispy fried chicken recipe today!
What is Crispy Fried Chicken?
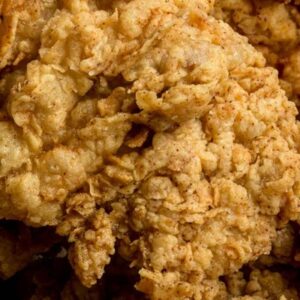
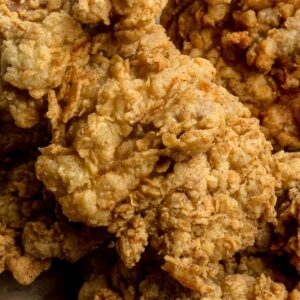
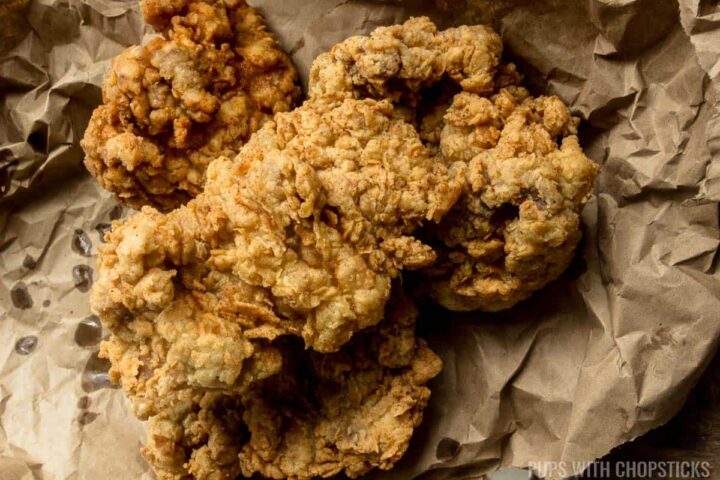
Crispy fried chicken is a popular dish made by coating chicken pieces with a seasoned flour mixture and frying them until they are golden brown and crispy on the outside.
One of the main reasons why crispy fried chicken is such a popular favorite is because of its irresistible texture. The outer coating becomes crispy and crunchy while the meat inside remains tender and juicy. This contrast is super delicious and just perfect.
My ultimate crispy fried chicken recipe has only 3 main requirements.
- It has to be super crispy
- The crispy skin cannot fall off the chicken easily, or with one bite.
- It must be juicy (not dry or rubbery)
If you take a look around my blog, you'll notice that I have a lot of deep-fried recipes, so I've had a lot of time and practice with the different types of batters and techniques!
From the ever so popular, Sweet and Stick Crispy Beef, to the popular takeout recipes with flavorful batters like Chicken Manchurian, Chilli Chicken, Sweet and Sour Pork, Chilli Chicken, Sweet and Sour Chicken and Crispy Chicken Pakoras made with chickpea flour. If you're looking for something crispy and flavorful, I got you covered!
What’s best is that my crispy fried chicken is a very flexible recipe. You can make it with dark meat, white meat (for chicken tenders), or wings! My favorite way to make fried chicken is with boneless dark meat because it stays juicy, cooks more quickly, and has double the surface area for a crunchy batter.
Why You’ll Love This Crispy Fried Chicken Recipe
Easy to make: This recipe is simple and straightforward, making it perfect for even the most inexperienced cooks. The steps are easy to follow and require minimal ingredients, so anyone can whip up a batch of crispy fried chicken with ease.
Versatile: It can be customized to suit different tastes and preferences. Whether you prefer a spicy twist or mild flavor, you can easily adjust the seasoning to your liking. Plus, it can be served as a main dish, used in sandwiches, or even added to salads, making it a versatile option for any meal.
Flexible: My crispy fried chicken is a very flexible recipe. You can make it with dark meat, white meat (for chicken tenders), or wings! My favorite way to make fried chicken is with boneless dark meat because it stays juicy, cooks more quickly, and has double the surface area for a crunchy batter.
Delicious: It is undeniably delicious as the combination of the crispy, golden-brown exterior and the tender, juicy meat inside serves to create a mouthwatering experience with every bite.
Crowd-pleaser: This recipe is sure to be a hit with the crowd. Whether you’re cooking for a small family dinner or hosting a larger gathering, this dish is guaranteed to please everyone. Its classic flavor and satisfying crunch makes it an all-time favorite that will have everyone asking for seconds.
Time-tested: This recipe has stood the test of time and is my ultimate super crispy fried chicken recipe. Trust me, you’re going to absolutely love every bit of it!
Joyce's Tips For Extra Crispy Fried Chicken
- Don't Overcrowd the Pan - When we put too many pieces of chicken into the pan, it will drop the oil temperature. This will make the batter oil logged which makes it less crispy. Try to only deep fry a few pieces at a time. In a large deep fryer, I only put in about 2 pieces at time.
- Use Starch - Starch makes everything EXTRA crispy. When I want to sauce anything crispy, I use pure starch with no flour because deep fried starch makes everything very hard and crunchy so sauces don't make the batter soggy. But when I'm making fried chicken to eat on its own, I want it crispy and not crunchy hard, so I mix starch into flour to give it a more delicate but still very crispy exterior crust.
- Double Fry - After you finish deep frying your chicken, add it back into the oil and fry it again for 30 seconds to 1 minute. This Korean deep frying method makes the crispy skin even more crispy.
- Pat the Chicken Dry Before Battering - There's no point in crispy skin if it falls off the chicken with one bite, so it's crucial to dry the chicken very well before you start the battering process, especially after you have brined the chicken. The chicken skin should feel tacky before you do the first flour dusting.
Ingredients You’ll Need to Make Crispy Fried Chicken At Home
All you need are some incredibly simple, pantry-staple ingredients to make this delicious crispy fried chicken recipe at home.
Here's an overview of the specific ingredients for this recipe. For the exact ingredients and measurements, please scroll to the recipe card below.
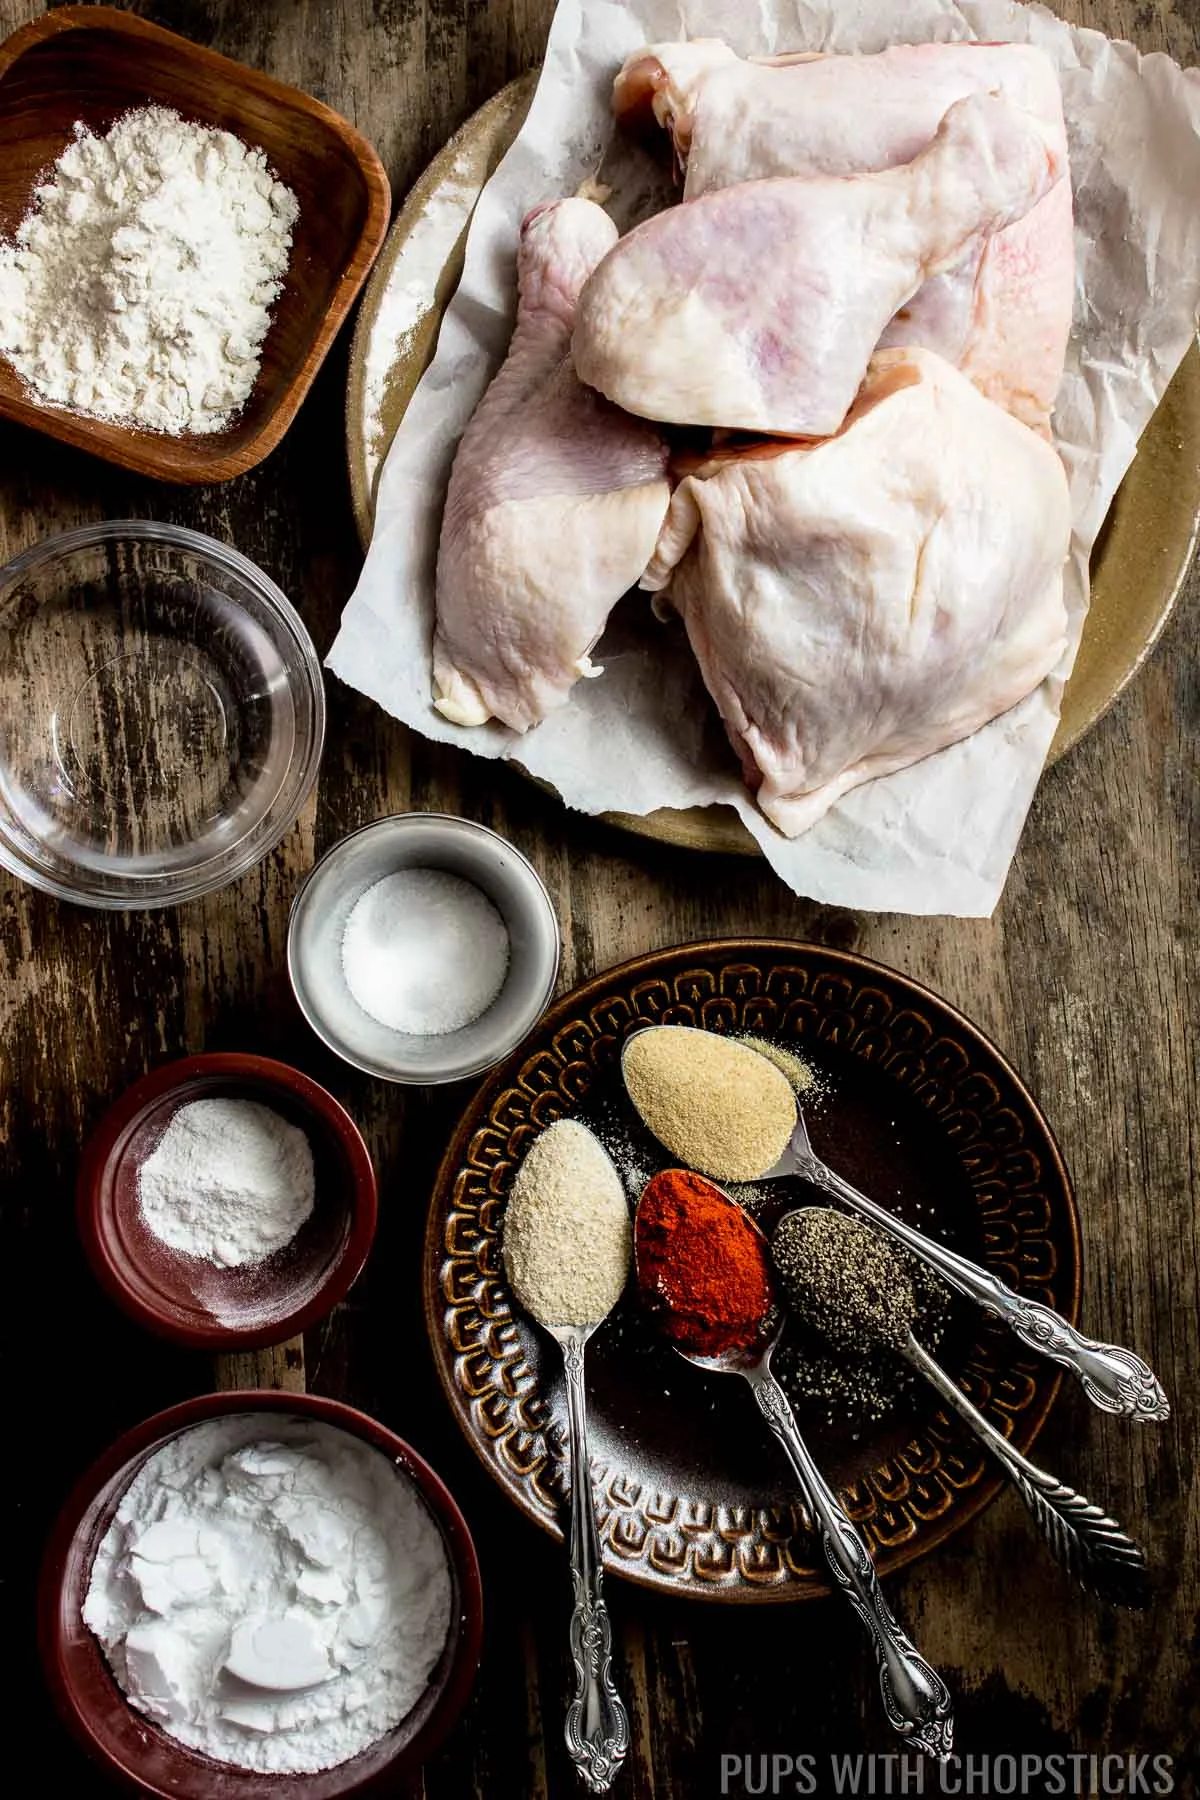
- Chicken: I’ve used chicken legs for this but my recipe is super versatile. This means you can make it with dark meat, white meat (for chicken tenders), or wings! My favorite way to make fried chicken is with boneless dark meat because it stays juicy, cooks more quickly, and has double the surface area for a crunchy batter.
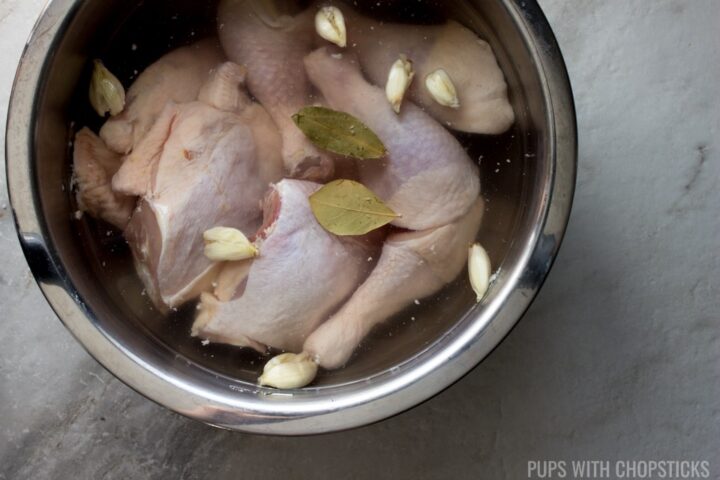
For the Brine:
- Salt: We will need some salt for the brine. It’ll enhance the taste and help tenderize the meat while making sure you get a juicy chicken that’s absolutely delicious.
- Water: You’ll also need some water for the base of the brine. It’ll help infuse all the flavors into the chicken and keep the meat moist during cooking.
- Garlic Cloves: We will also need some garlic cloves to add a delicious garlic flavor to the brine.
- Bay Leaves: We will add bay leaves to give a subtle and earthy flavor to the brine and it’ll add the perfect aroma to the chicken. You can also get fancy and add more exotic spices as long as the salt to water ration is 3-4 tablespoons to 8 cups of water.
For the Dry Mix:
- Potato starch: The key to a crispy chicken is adding a bit of starch into your flour mix. It can be either potato starch or corn starch but the chicken turns out a LOT crispier and stays crispier if you use potato starch.
- All-purpose flour: We will also need all-purpose flour in the dry mix. It will help bind the ingredients together and create a light and crispy texture.
- Black pepper: This will add a subtle pepper flavor and enhance the overall flavor of the chicken.
- Onion powder: We will be adding onion powder in the dry mix to give the chicken a touch of onion flavor.
- Garlic powder: You will also be using garlic powder. It’ll add a robust and aromatic taste to the chicken. But remember that you can experiment and add and take out whatever spices you like for this crispy fried chicken recipe but make sure to always use salt, garlic powder and onion powder for the best flavor.
- Salt: We will also need salt in the dry mix to enhance the flavors of the other ingredients.
- Cayenne pepper: We have the option of adding cayenne pepper to the dry mix for an extra kick of heat and spice. But you can skip this as well if you prefer.
For the Wet Batter:
- Dry mix: We will need to use a portion of the dry mix that we previously pre-mixed mixed with vinegar and cold water to create a wet batter that will coat the chicken. It will create a flavorful and crispy crust when fried together with the dry-mix.
- White Vinegar: For the wet batter, I like to use white vinegar instead of egg. It adds extra flavor to the batter, and there's no extra protein in it so it creates a very crunchy batter. Don't worry it won't make the batter sour or tangy.
- Cold Water: I use cold water because it reduces gluten formation during the battering process. Gluten will make your batter chewy and tough. Alternatively, you can also use carbonated water like club soda as well.
How to Make the Best Crispy Fried Chicken (Step by Step)
How to Brine the Chicken

In a large bowl, combine all the brine ingredients. Make sure to thoroughly mix everything together.
If you are using chicken legs, separate the drums from the thighs so that you have 8 pieces of chicken. This will guarantee even cooking.
Add the chicken to the brine mixture and make sure that all the pieces are fully submerged.
Place the bowl in the refrigerator and let the chicken marinate for at least 4 hours. This will help the chicken become tender and delicious.
About one hour before you are ready to deep fry the chicken, take it out of the fridge and let it come to room temperature. This step is important because it allows the chicken to cook evenly and prevents the oil from dropping to a low temperature when you fry it.
How to Make the Dry Mix
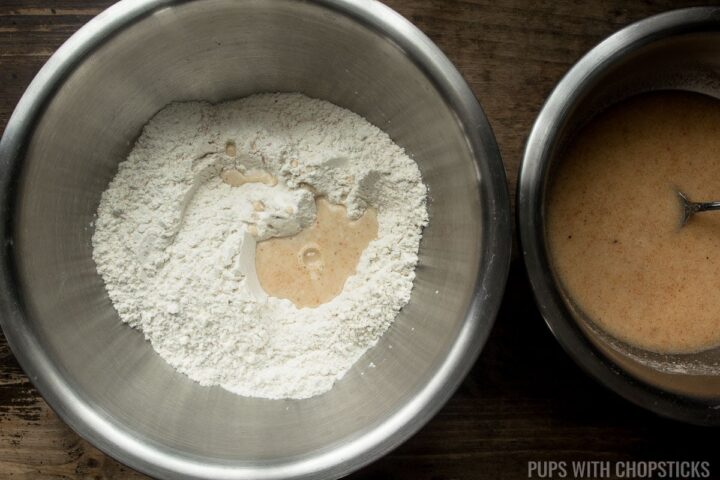
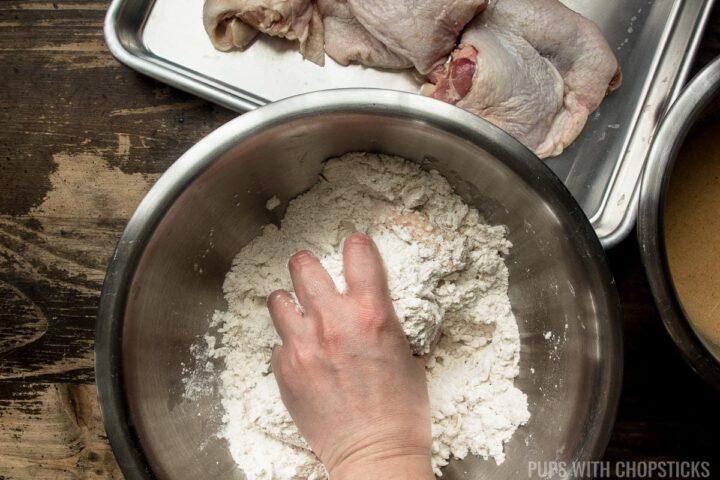
In a separate large bowl, combine all the ingredients listed under the “Dry Mix” section. Mix everything together until well combined. Set aside ½ cup of this dry mix for to make the wet batter later.
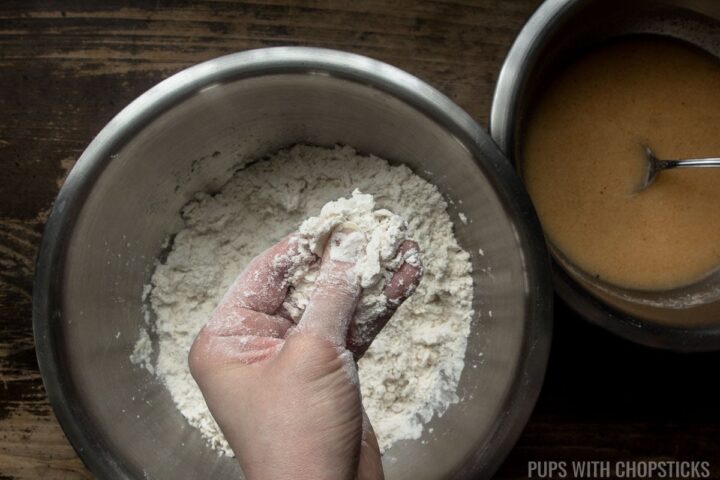
To get a very textured and crispy chicken with a lot of nooks and crannies, add 2-3 tablespoons of brine or water into the dry mix and use your fingers to work it into the dry mix until it becomes slightly clumpier and moist.
This will give the dry mix a bit of texture.
As time goes on, you will notice your dry batter will naturally have clumps from the wet batter anyways - just use your fingers and smush them back into the dry flour to break them into smaller pieces.

How to Make the Wet Batter
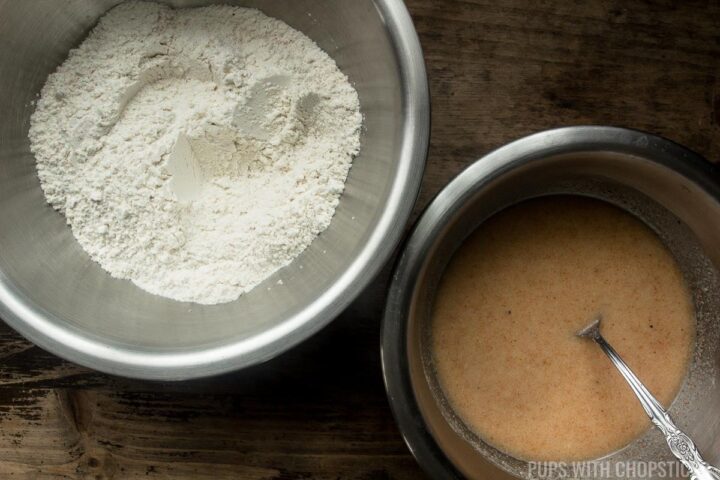
In another bowl, take the reserved ½ cup of dry mix and add white vinegar and ice water. Mix everything together until it forms a smooth batter. Set this wet mix aside.
How to Batter the Chicken with Both Dry and Wet Mix

When you are ready to batter the chicken, remove it from the brine and use paper towels to pat it dry. It’s super important to remove any excess moisture from the chicken to guarantee a crispy coating.
This is also very important because it will help prevent the batter from falling off the chicken after it has been deep fried.
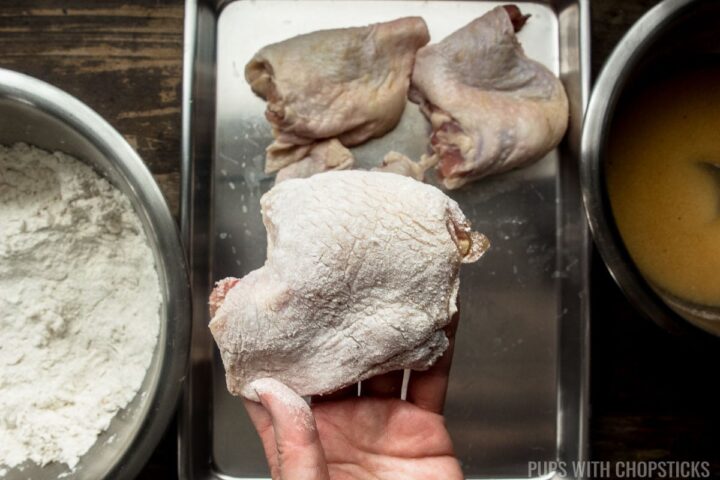
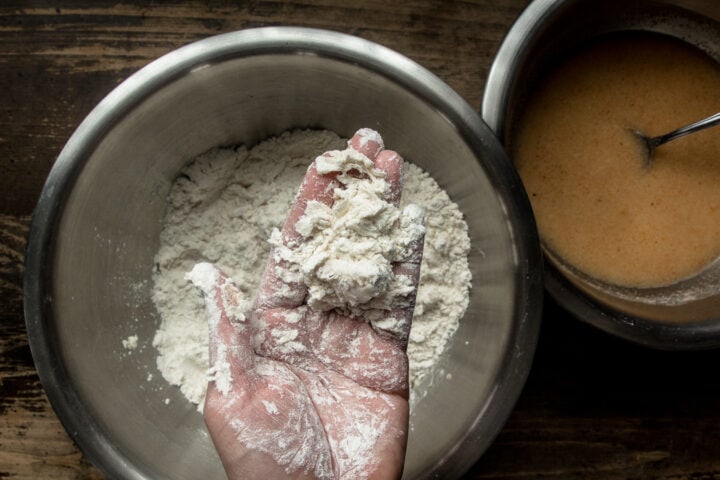
Take one piece of chicken at a time and coat it lightly with the dry mix. Shake off any excess flour. This initial flouring should provide a thin and even coating on the chicken. This thin layer will help the batter stick to the skin, instead of wicking off the slippery skin.
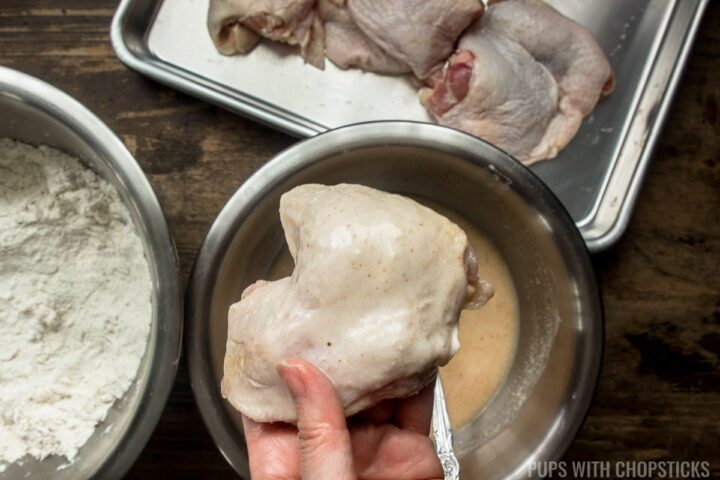
Use a fork to mix the wet batter again, as it may have settled and separated. Quickly dunk one piece of chicken into the wet batter, making sure it is fully coated.
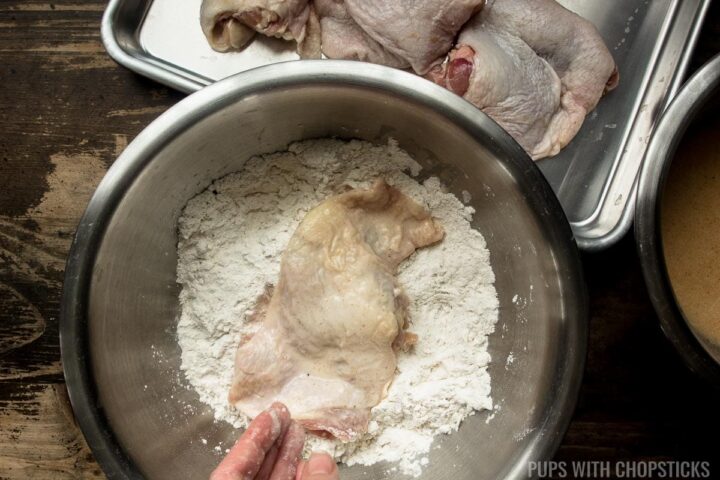
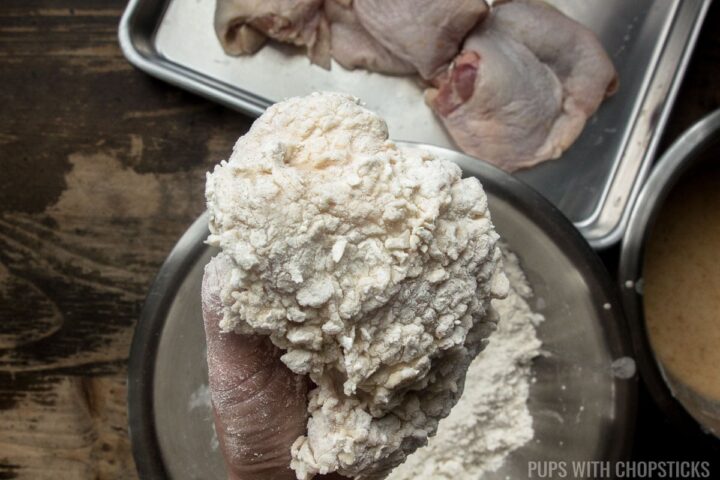
Immediately place the wet chicken piece back into the reserved dry mix. Use your hand to press the mix into the chicken, all the while, making sure that it is fully covered. Give it a solid squeeze to adhere the dry mix to the wet batter.
Remove the chicken from the dry mix and vigorously shake off any excess flour. This will create the nooks and crannies that make the chicken extra crispy.
Place the chicken on a plate in a single layer, making sure that they don’t touch each other. Repeat the steps for each piece of chicken.
How to Deep Fry the Chicken
Now it is time to deep fry the chicken. Fill a cast iron pan or deep fryer with oil and set the temperature to 350F (177C).
Once the oil has reached the desired temperature, you can test it by sticking a wooden chopstick or spoon into it. If it bubbles vigorously, the oil is ready.
Slowly add the chicken pieces to the hot oil, making sure not to overcrowd the pan. You may need to fry the chicken in batches in order to maintain the oil temperature.
Cook the chicken for 18-20 minutes. In you're using boneless chicken, reduce the cooking time to 6-10 minutes.
Once all the chicken pieces have been fried, make sure to return them to the oil for a second frying, this is a Korean deep frying method called Double Frying. Fry them for an additional 30 seconds to 1 minute will make them extra crispy.
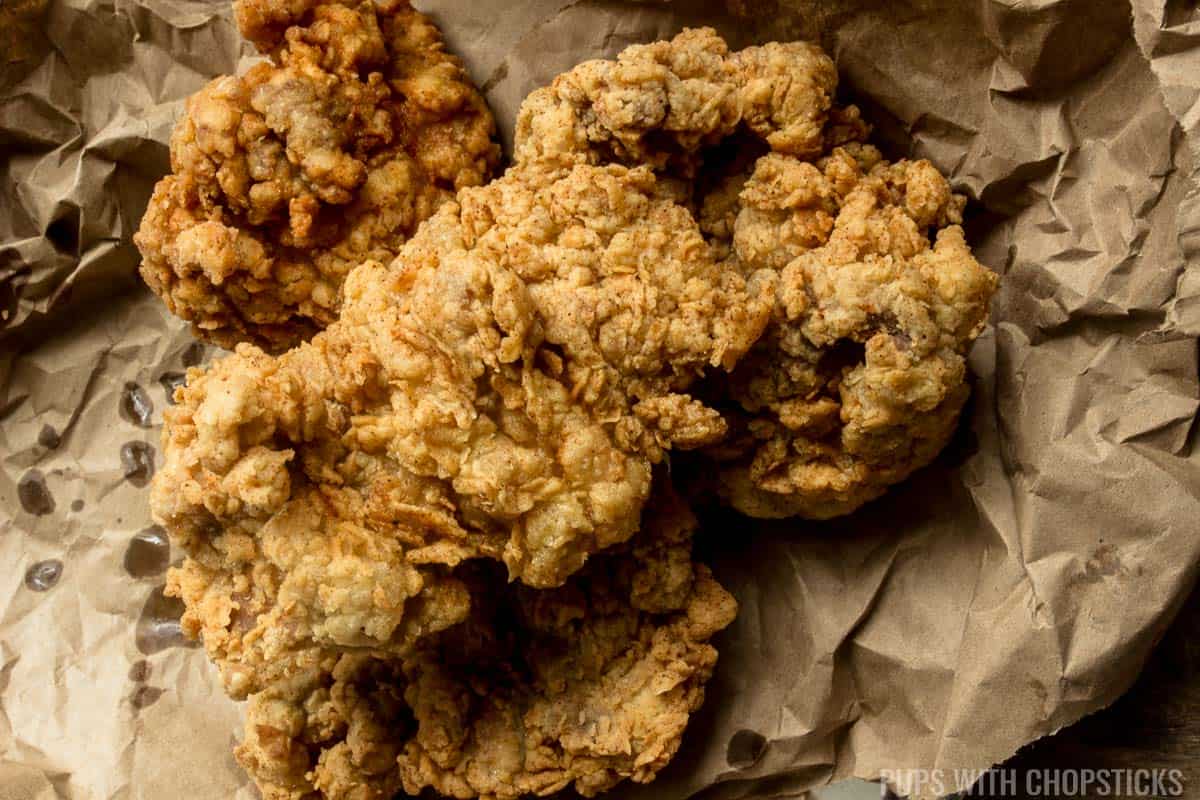
Remove the chicken from the oil and let it rest on a rack, newspaper, or parchment paper for a few minutes. This will allow any excess oil to drain off.
Now your crispy fried chicken is ready to be enjoyed! Serve it hot and enjoy the delicious flavors and crispy texture.
Why Use a Brine for Crispy Fried Chicken?
A brine will help your fried chicken stay juicy and prevent it from being rubbery, especially if you are deep frying white meat.
Brining is an optional step, but I highly recommend it if you have time.
For the spices in the brine, you can pretty much go nuts. I like to add fresh garlic and a few bay leaves to keep things simple but if you're feeling fancy, you can definitely add more exotic spices in as long as the salt to water ratio is 3-4 tablespoons to 8 cups of water.
Brine your chicken for a minimum of 4 hours, but it works best if it's brine overnight.
How Do You Keep Batter From Falling Off Fried Chicken
Make sure you dry the chicken REALLY well (with a paper towel or air dry) right before you lightly coat it with the dry mix. This is a SUPER IMPORTANT step.
Many people don't mention this small minor detail but it makes a world of difference when it comes to making the crispy part stick to your chicken and is well worth the effort if you don't like your batter coming off easily and enjoy every bite of chicken to be crispy.
Deep Frying Temperature Tips for Crispy Fried Chicken
For this crispy fried chicken recipe, the temperature is important. I ate a whole lot of burnt crispy chicken with raw insides this year (blech) and I found that my biggest issue was the outsides were always cooking faster than the insides so I was getting a lot of dark brown (borderline burnt) crispy chicken with raw insides.
Here's how to avoid it by using the right temperatures.
- Oil Temperature below 340 - This gave me a greasy oil-logged chicken. It was crispy, but not super crispy but the batter was not burnt and my chicken was cooked all the way.
- Oil Temperature at 340-350 degrees - This was just right. It gave my chicken a non-greasy feeling and it was super crispy and golden brown. It cooked perfectly through to the center as well.
- Oil Temperature at 360-375 degrees - This made my chicken super dark on the outside sometimes burnt and raw on the inside. My chicken would become dark brown within 3 minutes which is not long enough for the chicken to cook all the way through.
What Type of Oil to Use to Deep Fry Chicken
For deep frying, I like to use canola or corn oil, this is not limited to just this crispy fried chicken recipe - I use it for any type of frying I have to do.
Peanut oil also works and has a super high smoking point, which makes it the ideal oil to deep fry with but it's a very expensive oil, and if you deep fry often and change the oil all the time the bill can add up!
You also want to keep in mind that there are a lot of peanut allergies out there and since a lot of deep-fried foods are meant to be shared, it's something to keep in mind when using it.
Serving Suggestions
- Serve the crispy fried chicken with a side of mashed potatoes and gravy for a classic comfort food meal. Both the creamy potatoes and the savory gravy compliments the crispy chicken perfectly.
- Create a Southern-inspired meal by serving the crispy fried chicken with a side of coleslaw and cornbread. The tangy and crunchy coleslaw adds a refreshing contrast to the crispy chicken, while the sweet and fluffy cornbread completes the meal.
- For a healthier option, serve the crispy fried chicken with a fresh green salad. The crispy chicken adds a satisfying crunch to the salad, while the fresh vegetables provide a light and refreshing balance.
- Make it a sandwich by placing the crispy fried chicken between two slices of toasted bread or buns. Add some lettuce, tomato, and your favorite condiments to create a delicious meal. I like to make it to a spicy chicken sandwich by adding a bit of cayenne to the dry-mix and using spicy sriracha mayo as a condiment. To give it an Asian twist, you can also use bao buns.
- For a unique twist, serve the crispy fried chicken with a side of waffles. The combination of crispy chicken and fluffy waffles creates a delightful contrast in textures and flavors. Drizzle some maple syrup or hot sauce on top for an extra twist.
- If you made boneless fried chicken, you can toss it in your favorite sauces like sweet and sour sauce or make it a Korean fried chicken by tossing it in a sweet gochujang sauce or a honey soy glaze.
Recipe Variation Ideas for Crispy Fried Chicken
This delicious extra crispy fried chicken recipe is so delicious and easy to make, you'll want to try out some of these delicious variations! Here are some great ideas:
Spicy: Add a few teaspoons of cayenne pepper to the dry mix to give your fried chicken extra heat. This is perfect for those who enjoy spicy food and want to add an extra layer of flavor to their crispy fried chicken.
Herb-infused: Mix in a tablespoon of dried herbs like thyme, rosemary, or oregano into the dry mix to create a flavorful herb-infused fried chicken. This is great for those who want to add a subtle but aromatic taste to their crispy fried chicken.
Garlic Parmesan: Add an extra tablespoon of garlic powder to the dry mix and toss the finished fried chicken with grated parmesan cheese for a savory and cheesy twist on crispy fried chicken. This is perfect for garlic and cheese lovers who want to take their fried chicken to the next level.
Honey Mustard: Drizzle honey mustard sauce over the fried chicken after it is cooked for a sweet and tangy flavor combination. This is ideal for those who enjoy the combination of sweet and savory flavors.
Lemon Pepper: Add some lemon pepper seasoning into the dry mix to give your fried chicken a tangy and zesty taste. This is great for those who enjoy the refreshing flavor of lemon and want to add a citrusy twist to their crispy fried chicken.
Frequently Asked Questions
Can I use boneless chicken for this recipe?
Yes, you can use boneless chicken for this recipe. However, keep in mind that bone-in chicken will provide more flavor and juiciness to the final dish.
Can I use a different type of oil for frying?
For deep frying, I like to use canola or corn oil, this is not limited to just this crispy fried chicken recipe - I use it for any type of frying I have to do.
Peanut oil also works and has a super high smoking point, which makes it the ideal oil to deep fry with but it's a very expensive oil, and if you deep fry often and change the oil all the time the bill can add up!
How can I make the chicken extra crispy?
The secret to getting a lot of nooks and crannies for the crispy texture is covering the freshly wet battered chicken with a pile of the dry flour mix and squeezing the flour onto the chicken and shaking it out vigorously!
The shaking will form all the nooks and cranny textures which means it'll be more crispy!
You also want to make sure there is starch in your dry-mix and double frying at the very end will also help make your chicken extra crunchy.
Can I use a different seasoning blend for the flour mixture?
Yes, you can customize the seasoning blend for the flour mixture in order to suit your taste preferences. You can add spices like paprika, garlic powder, onion powder, or cayenne pepper to enhance the flavor of the chicken.
How to Store Leftover Crispy Fried Chicken
To store leftovers, you should first allow the chicken to cool down to room temperature, then transfer it to an airtight container or wrap it tightly in plastic wrap. Place the container or wrapped chicken in the refrigerator and it should be consumed within 3-4 days.
To reheat the leftovers, you can either choose to use an air fryer or an oven. For the air fryer method, place the desired amount of chicken in the air fryer and set the temperature to 330f. Heat it for 3-5 minutes at a time, making sure to check on it and flip it every 3 minutes to make sure it doesn't burn.
For the oven method, first preheat the oven to 350°F (175°C) then place the chicken on a baking sheet. Heat for about 10-15 minutes, or until heated through.
Unfortunately, this particular recipe may not be suitable for freezing. Freezing can alter the texture and taste of the chicken, resulting in a loss of its crispy and crunchy coating.
It is recommended to consume the leftovers within a few days or share them with friends and family to avoid waste.
More Takeout Recipes You May Like
- Crispy Bite Sized Honey Garlic Ribs
- Korean Fried Popcorn Turkey Nuggets
- Crispy Buttermilk Popcorn Chicken
- Sweet and Sticky Char Siu (Chinese BBQ Pork)
- Umami Beef and Pork Burgers
- Crispy Lemongrass Chicken Tacos
- Chinese Lemon Chicken
Did You Make This Crispy Fried Chicken Recipe?
If you made this extra crispy fried chicken recipe, I want to see! Follow Pups with Chopsticks on Instagram, snap a photo, and tag and hashtag it with @pupswithchopsticks and #pupswithchopsticks. I love to know what you are making!
Please also consider leaving a ⭐⭐⭐⭐⭐ rating and a comment to tell me how it went! I'd love to hear from you if you made this!
If you like my recipes and want to be updated on when new ones come out, please consider subscribing to my newsletter (we don't spam) and follow along on Instagram, Facebook, and Pinterest for all of my latest recipes!
Recipe Card
My Ultimate Super Crispy Fried Chicken Recipe
Joyce's Recipe Notes
- For the brine, switch up the spices you add in there and have some fun with it! 🙂
- When you are coating your chicken in the dry mix, and you notice the batter making the dry mix clumpy - this is a good thing! You can run your fingers through the mix to find all the clumps and rub them between your fingers to break them back down into smaller fine bits - these bits will be added textures for the crispy chicken.
- I like adding a cup of pickle brine to the brine for some extra flavor, when I have some on hand!
- Don't Overcrowd the Pan - When we put too many pieces of chicken into the pan, it will drop the oil temperature. This will make the batter oil logged which makes it less crispy. Try to only deep fry a few pieces at a time. In a large deep fryer, I only put in about 2 pieces at time.
- After you finish deep frying your chicken, it's best to rest the chicken on newspaper, a cookie rack, or parchment paper. Try not to use paper towel, the heat causes a bit of steam between the chicken and the wet paper towel.
- Double Fry - After you finish deep frying your chicken, add it back into the oil and fry it again for 30 seconds to 1 minute. This Korean deep frying method makes the crispy skin even more crispy.
Ingredients
- 4 Chicken Legs (Separated into drums and thighs to make 8 pieces)
Brine
- 3 tablespoons salt
- 8 cups water
- 2-3 cloves garlic
- 2-3 bay leaves
Dry Mix
- ½ cup potato starch (or corn starch)
- 2 cups all-purpose flour
- 1 ½ teaspoon black pepper
- 2 teaspoon onion powder
- 2 teaspoon garlic powder (not garlic salt)
- 2 teaspoon salt
- 4 teaspoon cayenne pepper (optional ingredient, this makes a spicy chicken, start with 1 teaspoon for a less spicy chicken)
Wet Batter
- ½ cup "Dry Mix" (reserved from the 'Dry Mix' mixture above)
- ½ cup white vinegar
- ¾ cup cold water (or carbonated water but it must be cold)
Instructions
Brining
- In a large bowl, combine all the brine ingredients.
- If you are using chicken legs, separate the drums from the thighs so that it becomes 8 pieces of chicken.
- Add the chicken to the brine and let it sit for a minimum of 4 hours in the fridge Bring it out of the fridge 1 hour before you are ready to deep fry so that the chicken can come to room temperature. This will help the chicken cook all the way through and it prevents the oil from dropping to a very low temperature when you deep fry it.
Making the Dry Mix
- In a large bowl, combine all the ingredients of the "Dry Mix" from the ingredient list. Reserve ½ cup of it aside to make the "Wet Mix" and set the rest aside for later.
- (Optional) If you want a more textured crispy batter, add 2-3 tablespoons of the brine or water into the 'dry mix' and work it into the mix.
- Use your fingers to rub the brine into the flour until all the brine is mixed very well into the flour.
- This will make the flour slightly more textured.
Making the Wet Batter
- Add the reserved ½ cup of dry mix into another bowl and add in the white vinegar and ice water and mix well until everything is combined. Set this aside
Battering The Chicken
- When you are ready to batter the chicken, remove it from the brine and dry it out VERY WELL with paper towel
- One at a time put the chicken into the dry mix and coat it with a light dusting. Shake very well. You want a very light coating for the initial flouring only.
- Use a fork to re-mix the wet batter (it may have settled and separated)
- Dunk one piece of chicken quickly into the wet batter
- Quickly add the wet chicken piece back into the "Dry Mix" and completely cover the chicken in the mix.
- Use your hand and press the dry mix into the chicken. I like to give it a solid squeeze.
- Remove the chicken from the dry mix and vigorously shake off the flour to create the nooks and crannies.
- Remove the chicken from the dry mix and set it in a single layer on a plate.
- Do this for every piece of chicken.
Deep Frying the Chicken
- Fill a cast iron pan or deep fryer with oil and set the temperature to 350F (177C)
- Once the oil is hot (you can do a test if it's hot enough by sticking a wooden chopstick or wooden spoon into it to see if it bubbles) add in the chicken slowly. Do not overcrowd the pan, you don't want the oil temperature to drop. You may need to cook this in a few batches. I like to put about 2 pieces in per dutch oven.
- Cook the chicken for 18-20 minutes. (If you are using boneless chicken, cook it for 6-10 minutes instead)
- Once all the chicken has been fried, put it back in the oil and fry it for a second time for 1 minute. This will make the chicken extra crispy.
- Let it rest on a rack, newspaper or parchment paper for a few minutes before digging in. Enjoy!
Nutrition
*Nutritional information is calculated using online tools and is an estimate*
Disclaimer: We are a participant in the Amazon Services LLC Associates Program, an affiliate advertising program designed to provide a means for us to earn fees by linking to Amazon.com and affiliated sites, while I appreciate the support - I would prefer you buy your items locally if possible to support your local shops (and chances are they are cheaper locally as well!)


sonaltadigibiz.co.in says
I really like reading through a post that will make people think.
Also, thank you for allowing for me to comment!
Brucey boy says
Followed the recipe pretty closely. 2 hours in the brine. I had a crispy chicken meal in a restaurant and wanted to replicate it. This pretty well did it. With plum sauce! Hassleback potatoes. Instead of costing $185 at the restaurant, it cost $30. Used trimmed thighs. Absolutely delicious. Many Thanks.
Joyce Lee says
Hi Brucey!
Yay I am so happy this turned out for you! Thanks so much for taking the time to let me know! I always appreciate it 🙂 I'm super happy to share!
Wai says
First recipe to pop up & tried it because I couldn’t be bothered looking elsewhere - wooow exceeded my expectations , the family recons they’d rather eat this than kfc 😂 loved it !
Joyce Lee says
Hi Wai!
I'm happy you tried this! haha! I'm so happy everyone liked it! Your family is hilarious! 🤣
Tom Bandle says
I am unable to print the recipe with my tablet. Can you email the entire article / web message to me . Sounds awesome , cannot wait to try .
anne says
excellent!!! Made it last night-was really delicious.
Joyce says
Hi Anne!
I am so happy you liked this!! I'm craving fried chicken now! haha! 🙂
bob says
it horrible
Richard Lambert says
Made it. Nailed it. Best chicken ever, just don't stray too far from the technique, that is the most important part. Otherwise the seasonings are all infinitely interchangeable
Joyce says
Woohoo!! So glad to hear you nailed it and liked it Richard! The technique is definitely an important part and I do highly recommend swapping out the seasonings to your tastes. I can't get enough fried chicken too haha! I swear I crave it on a weekly basis!